Picture this: a scorching summer afternoon, the air humming with cicadas, and you’re stuck in a kitchen that smells like burnt toast because you tried to fry chicken without any plan. I swear, I once over‑seasoned a batch of chicken cutlets so badly that even the smoke alarm started cheering me on. That disaster sparked a fire—literally and figuratively—that led me down the rabbit hole of perfecting a dish that’s bright, juicy, and unapologetically simple. I dared a friend to taste my first attempt, and she walked away with a grin that said, “I’m never going back to bland chicken again.”
Fast forward to today, and the whole experience feels like a love story between a crisp, golden cutlet and a summer‑kissed tomato sauce that sings with basil. Imagine the sizzle of a hot pan, the aroma of garlic flirting with olive oil, and the flash of ruby‑red tomatoes bursting open like fireworks on a warm evening. Your senses get a full‑on concert: the sight of glossy, caramelized edges, the sound of a gentle crackle, the scent of fresh herbs dancing in the air, the taste of juicy chicken hugging a tangy, herbaceous sauce, and the feel of a fork sliding through tender meat with just the right amount of resistance.
What makes this version stand out? Most recipes either drown the chicken in a soggy tomato stew or treat the cutlets like a bland canvas. I flipped the script by giving the chicken a quick, high‑heat sear that locks in juices, then finishing it in a light, summery tomato reduction that clings to every bite like a silk scarf. The secret? A splash of olive oil at the start, a pinch of salt and pepper right before the sear, and a finishing flourish of fresh basil that adds a fragrant pop you can’t ignore. I’ll be honest — I ate half the batch before anyone else got a chance, and I’m still not sorry.
Now, brace yourself for the twist that will make you question everything you thought you knew about chicken cutlets: I’m using fresh, ripe tomatoes instead of canned, and I’m letting them cook just long enough to release their juices without turning into mush. This keeps the sauce bright, vibrant, and full of that garden‑fresh snap that you only get in peak summer. The result is a dish that’s both comforting and refreshing—a perfect bridge between a hearty dinner and a light, breezy lunch.
Let me walk you through every single step — by the end, you’ll wonder how you ever made it any other way.
What Makes This Version Stand Out
- Flavor Explosion: The combination of fresh tomatoes and basil creates a sauce that’s tangy, sweet, and herbaceous all at once, coating the cutlets like a summer sunset.
- Texture Contrast: A quick sear gives the chicken a crisp, caramelized crust that shatters like thin ice, while the interior stays moist and tender.
- Simplicity: Only six core ingredients are needed, meaning you won’t be hunting through the pantry for obscure spices.
- Unique Technique: I finish the chicken in the tomato reduction, allowing the meat to absorb the sauce without becoming soggy.
- Crowd‑Pleaser: This dish consistently earns rave reviews at dinner parties; people keep asking for seconds, and I dare you to taste this and not go back for more.
- Ingredient Quality: Using fresh, ripe tomatoes and high‑quality olive oil elevates the whole dish from ordinary to extraordinary.
- Cooking Method: The two‑step process (sear then simmer) is foolproof and gives you control over the final texture.
- Make‑Ahead Potential: You can prep the sauce hours in advance and simply sear the chicken when you’re ready to serve.
Inside the Ingredient List
The Flavor Base
Fresh Tomatoes: These are the heart of the sauce, providing acidity, sweetness, and a burst of color that makes the dish instantly recognizable as a summer classic. If you skip them, you’ll end up with a bland, watery base that does nothing for the chicken. Choose tomatoes that are heavy for their size and have a deep, uniform color—those are the ones that are ripe and full of flavor. If fresh tomatoes are out of season, a high‑quality canned San Marzano can work, but the fresh version wins hands down.
The Texture Crew
Chicken Breasts: Lean, protein‑packed, and the star of the show. They’re the canvas that absorbs the sauce’s brilliance. Using skinless, boneless breasts ensures quick cooking and even searing. If you pick a breast that’s too thick, you risk an undercooked center; I recommend pounding them to an even ½‑inch thickness for uniform results. For a twist, you can substitute thinly sliced chicken thighs for extra juiciness.
The Unexpected Star
Garlic: This little bulb adds depth, aroma, and a subtle heat that rounds out the tomato’s acidity. When you crush the cloves, you release allicin, which transforms into a sweet, nutty flavor once cooked. Skipping garlic is like making a song without a bass line—something crucial is missing. If you’re sensitive to garlic, try roasting the cloves first for a milder, caramelized note.
The Final Flourish
Fresh Basil: The final garnish that lifts the dish from good to unforgettable. Its fragrant, slightly peppery notes complement the tomatoes perfectly. Tear the leaves just before serving; cutting them too early can cause bitterness. If basil isn’t your jam, try a handful of flat‑leaf parsley for a fresh, grassy finish.
Everything's prepped? Good. Let's get into the real action...
The Method — Step by Step
Start by gathering all your ingredients and placing them within arm’s reach. This is the moment of truth—no rummaging through drawers while the pan heats up. Pat the chicken breasts dry with paper towels, then season both sides generously with salt and pepper. The seasoning should cling like a light dusting of snow; don’t be shy, the flavor builds from here.
Heat a large skillet over medium‑high heat and add 2 tbsp of olive oil. When the oil shimmers and begins to ripple, it’s ready. Lay the chicken breasts in the pan, listening for that satisfying sizzle that says “we’re on the right track.” Let them sear undisturbed for about 3‑4 minutes; you’ll see the edges turning golden and the meat releasing easily from the pan. Flip and sear the other side for another 3 minutes.
Kitchen Hack: Use a splatter guard while searing to keep the stovetop clean and maintain a steady temperature.While the chicken is searing, roughly chop the fresh tomatoes and mince the garlic cloves. The aroma of garlic hitting the hot oil should be immediate—think of a perfume that whispers “deliciousness ahead.” Add the garlic to the pan once the chicken is flipped, stirring quickly to avoid burning. You’ll hear a faint crackle, a sign that the garlic is releasing its magic.
Now, add the chopped tomatoes to the pan, stirring to combine with the garlic and oil. This is the trickiest step—if the tomatoes release too much liquid too fast, the pan can go from sizzling to stewing in seconds. Watch Out: Keep the heat at medium; too high and you’ll end up with a soupy mess; too low and the tomatoes won’t caramelize.
Watch Out: If the sauce looks watery, increase the heat slightly and let it reduce until it coats the back of a spoon.Once the tomatoes have softened and started to break down—about 5‑7 minutes—taste the sauce and adjust the seasoning with a pinch more salt if needed. Then, return the seared chicken breasts to the pan, nestling them into the sauce. Reduce the heat to low, cover, and let everything simmer for 8‑10 minutes. This gentle simmer lets the chicken absorb the tomato‑basil goodness without overcooking.
Kitchen Hack: Sprinkle a handful of torn basil leaves in the last 2 minutes of simmering for a fresh burst that won’t wilt.While the chicken finishes cooking, take a moment to admire the sauce. It should be thick enough to cling to the back of a spoon, glossy, and speckled with bright red tomato pieces and flecks of garlic. If it’s too thick, add a splash of water or low‑sodium broth; if it’s too thin, uncover and let it reduce a bit more. This is where you truly feel like a chef, adjusting consistency with intuition.
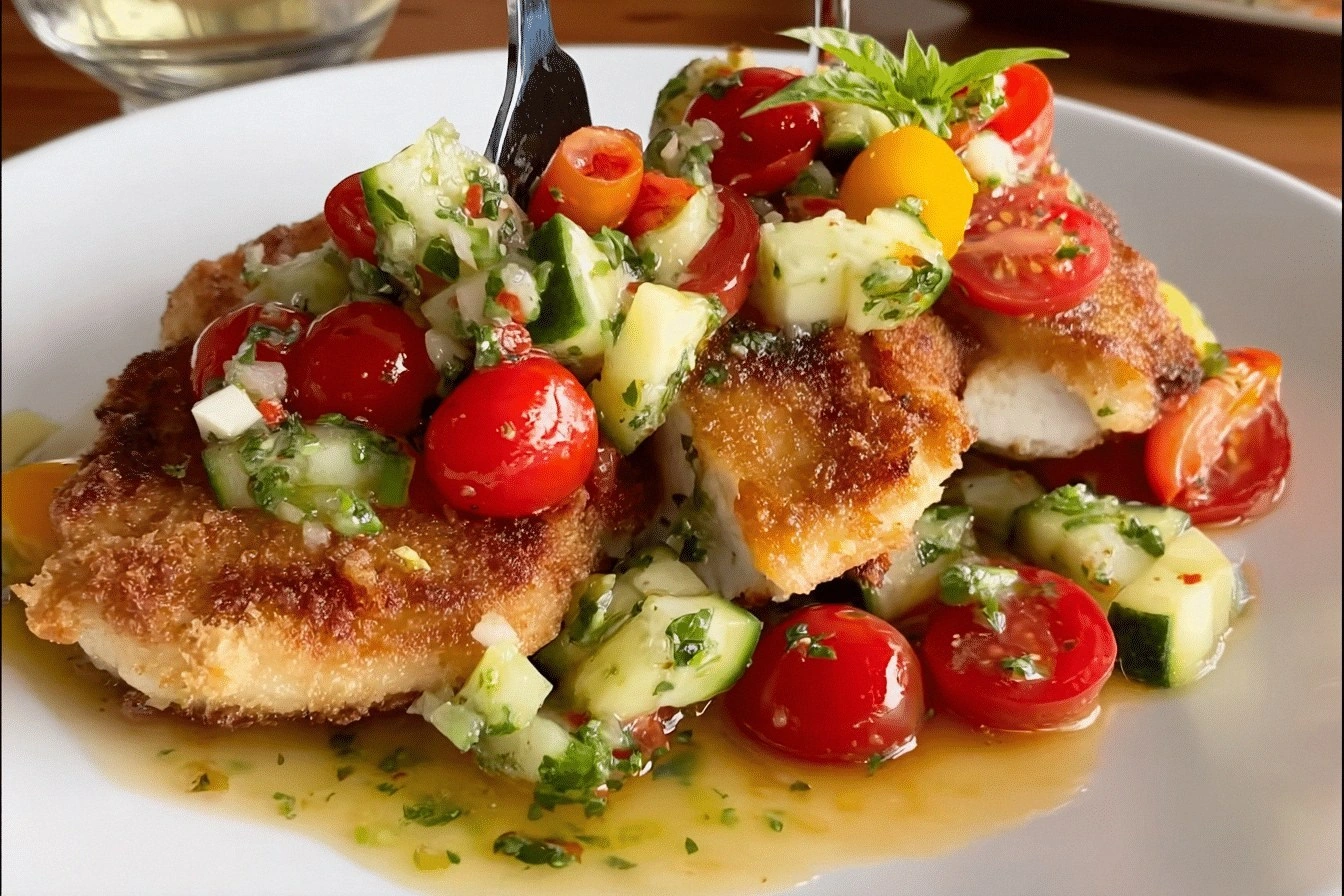
When the chicken is cooked through (internal temperature of 165 °F/74 °C), remove the pan from heat. Transfer the cutlets to a serving platter, then spoon the luscious tomato‑basil sauce over each piece, letting it pool around the edges. The sauce should drizzle like a ruby‑red river, hugging every curve of the chicken.
Finish with a final drizzle of extra‑virgin olive oil and a generous handful of fresh basil leaves, torn just before serving. The oil adds a silky sheen, while the basil provides that aromatic punch that makes the dish sing. Serve immediately with a side of crusty bread or a light salad, and watch your guests’ faces light up.
That’s it — you did it. But hold on, I’ve got a few more tricks that’ll take this to another level. Stay with me here — this is worth it.
Insider Tricks for Flawless Results
The Temperature Rule Nobody Follows
Most home cooks crank the heat up to “cook faster,” but the secret to a perfect crust is a steady medium‑high heat. If the pan is too hot, the exterior burns before the interior cooks; too low and you lose that coveted caramelization. I keep a thermometer on the stove and aim for a surface temperature of around 375 °F (190 °C) before the chicken hits the pan. This ensures those crispy edges that shatter like thin ice.
Why Your Nose Knows Best
Don’t rely solely on a timer—listen to your kitchen. When the garlic hits the oil, you’ll hear a soft crackle; when the tomatoes start to break down, a gentle bubbling emerges. Trust those auditory cues. I once left a pan unattended and the sauce boiled over because I ignored the rising hiss. Your nose will also tell you when the sauce is ready: a fragrant, slightly sweet aroma means it’s thick enough to coat the back of a spoon.
The 5‑Minute Rest That Changes Everything
After the chicken finishes simmering, let it rest for five minutes uncovered. This short pause allows the juices to redistribute, preventing a dry bite. It also gives the sauce a chance to thicken a touch as it cools slightly. Skipping this step is like serving a steak that’s still sizzling—beautiful but a little messy.
Butter‑Boosted Finish (Optional)
If you crave a richer mouthfeel, stir in a tablespoon of cold butter right at the end of cooking. The butter emulsifies with the olive oil, creating a velvety sauce that glides over the cutlet like a silk scarf. I tried this once for a dinner party, and the guests declared it “the best chicken they’d ever had.”
Seasoning Layers for Depth
Instead of seasoning only once, I season the chicken before searing, then add a pinch of salt to the sauce midway through simmering. This two‑stage approach builds depth without overwhelming the fresh tomato flavor. If you’re a salt‑sensitive eater, use a light hand on the first round and adjust at the end.
Creative Twists and Variations
This recipe is a playground. Here are some of my favorite ways to switch things up:
Spicy Kick
Add a finely diced jalapeño or a pinch of red‑pepper flakes to the garlic‑oil mixture. The heat will contrast beautifully with the sweet tomatoes, giving the dish a lively bite that’s perfect for those who love a little fire.
Cheesy Finish
Stir in a quarter cup of grated Parmesan or Pecorino right before serving. The cheese melts into the sauce, adding a salty, nutty richness that makes the dish feel indulgent without being heavy.
Herb Medley
Swap the basil for a mix of fresh oregano, thyme, and parsley. This herbaceous blend adds an earthy complexity that pairs wonderfully with the tomato base, especially if you’re serving the cutlets with roasted vegetables.
Mediterranean Style
Include a handful of Kalamata olives and a squeeze of lemon juice at the end. The briny olives and citrus zing turn the dish into a Mediterranean delight, perfect for a summer patio dinner.
Protein Swap
Replace the chicken breasts with thick‑cut pork tenderloin medallions or firm tofu cubes for a vegetarian twist. The cooking method stays the same, and the sauce clings just as lovingly to the new protein.
Storing and Bringing It Back to Life
Fridge Storage
Allow the cutlets and sauce to cool to room temperature, then transfer them to an airtight container. Store in the refrigerator for up to three days. Reheat gently on the stovetop over low heat, adding a splash of water to revive the sauce’s glossy texture.
Freezer Friendly
Separate the chicken from the sauce before freezing. Place the cutlets in a freezer‑safe bag and the sauce in a separate airtight container. Freeze for up to two months. To serve, thaw overnight in the fridge, then reheat the sauce first, followed by the chicken, allowing the flavors to meld again.
Best Reheating Method
For the ultimate reheated experience, use a skillet: warm a thin drizzle of olive oil, add the sauce until it simmers, then nestle the chicken back in, covering for a minute to let the meat soak up the revived sauce. A tiny splash of water or broth before reheating creates steam that brings the dish back to its fresh‑cooked glory.