Picture this: it’s a Sunday afternoon, the kitchen smells like burnt toast, and you’re staring at a half‑melted avocado that’s gone rogue. I was on the brink of throwing it into the trash when a friend dared me to turn it into something edible and, dare I say, delicious. That dare sparked a culinary experiment that turned a culinary catastrophe into a snack sensation. I’ve been bragging about those crispy avocado chips for weeks, and I’m ready to spill every secret, from the exact knife technique that keeps the chips from turning mushy to the surprising spice that gives them a kick. By the time you finish reading, you’ll know how to make the best avocado chips at home, and you’ll wonder why you ever settled for store‑bought chips before.
The first time I tried this, I was skeptical. I thought avocado, a fruit known for its creamy texture, could never become a crisp snack. But the moment the chips hit the pan, the sizzle was unmistakable—like a tiny drumbeat of triumph. The aroma that filled the room was a buttery, nutty perfume that made my mouth water in anticipation. My fingertips tingled with excitement as I watched the edges lift and crackle, a golden crust forming around each slice. I took a bite, and the crunch was a satisfying snap, followed by the creamy, buttery avocado flavor that lingered like a soft whisper. That instant revelation was the moment I realized I’d stumbled upon a game‑changing snack.
If you’ve ever struggled to make a healthy, crunchy snack, you’re not alone. Many recipes turn out soggy or unevenly cooked, but this version is a breath of fresh air. I’ve refined the process through countless trials, learning that the key is precision—both in cutting the avocado and in the cooking temperature. I’ll walk you through each step, from selecting the perfect avocado to that final golden crunch, so you’ll never have to worry about under‑cooked chips again. And trust me, the result is so addictive that I’ve already been tempted to devour the entire batch before anyone else can even get a taste.
What makes this version stand out? It’s not just the crispy texture; it’s the depth of flavor and the versatility that makes it a crowd‑pleaser at parties, a quick snack for busy days, or a fancy garnish for a sophisticated dinner. I’ve added a subtle smoky paprika, a hint of garlic powder, and a whisper of cayenne to give the chips a layered, complex taste that will keep your taste buds guessing. The method is straightforward, yet the results are spectacular, and the best part? It’s entirely homemade—no preservatives, no artificial flavors, just pure, wholesome goodness. Let’s dive into the details and see why this is hands down the best version you’ll ever make at home.
What Makes This Version Stand Out
- Flavor: The combination of smoked paprika, garlic powder, and a touch of cayenne creates a savory profile that’s both comforting and adventurous.
- Texture: A perfectly crisp exterior with a tender, buttery interior that melts in your mouth.
- Ease: The recipe uses pantry staples, so you can whip up a batch in minutes without a trip to the grocery store.
- Health: Packed with heart‑healthy fats from avocado and olive oil, while keeping calories in check.
- Make‑Ahead: You can prepare the chips a day in advance and reheat them for a fresh crunch.
- Versatility: Works as a snack, a side, or a crunchy topping for salads and soups.
- Presentation: The golden hue and glossy finish make them Instagram‑ready.
- Audience: From kids who love crunchy snacks to adults craving a healthy bite, everyone will love these.
Alright, let’s break down exactly what goes into this masterpiece…
Inside the Ingredient List
The Flavor Base
The heart of these chips lies in the blend of spices—smoked paprika, garlic powder, and a whisper of cayenne. Smoked paprika gives a subtle, earthy warmth that pairs beautifully with avocado’s natural nuttiness. Garlic powder adds depth without overpowering, while cayenne provides a gentle heat that wakes up the palate. If you’re a fan of extra heat, feel free to bump the cayenne up a notch, but remember that a little goes a long way.
Skipping any of these spices will leave the chips bland and flat. The combination is what turns a simple slice of avocado into a flavor powerhouse that’s both satisfying and memorable. For those who love to experiment, try adding a pinch of cumin or a dash of chili powder for a different twist. The key is balance—each spice should complement, not compete.
The Texture Crew
All‑purpose flour is the backbone of the crispy coating. It creates a light, airy shell that traps heat and turns the avocado into a crunchy delight. Olive oil is essential; it helps the flour adhere to the avocado and promotes even browning. Lemon juice brightens the overall flavor profile, cutting through the richness of the avocado and adding a subtle tang.
If you’re aiming for a gluten‑free version, swap the all‑purpose flour for almond flour or a gluten‑free blend. The texture might differ slightly—more dense and buttery—but the result remains delicious. Keep in mind that gluten‑free flours absorb more liquid, so you may need to adjust the amount of oil or flour to maintain the right consistency.
The Unexpected Star
The avocado itself is the star of the show, but not all avocados are created equal. Choose ripe, firm avocados that yield slightly to gentle pressure but don’t feel mushy. A ripe avocado has a buttery texture that holds up during cooking, preventing the chips from becoming soggy.
If you find yourself in a region where avocados are out of season, look for a variety that’s known for its rich flavor—Hass is the most popular for its creamy texture and robust taste. Avoid avocados that feel overly soft or have brown spots, as they can compromise the crispness and flavor of the final product.
The Final Flourish
A pinch of cayenne pepper is the finishing touch that gives the chips a subtle kick. It’s not just about heat; it’s about the aromatic oils that elevate the overall experience. If you prefer a milder version, omit the cayenne entirely or replace it with paprika alone.
The final flourish also includes a pinch of sea salt, which balances the flavors and enhances the natural sweetness of the avocado. Don’t underestimate the power of salt—it brings all the elements together and elevates the taste to a whole new level.
Everything's prepped? Good. Let's get into the real action…
The Method — Step by Step
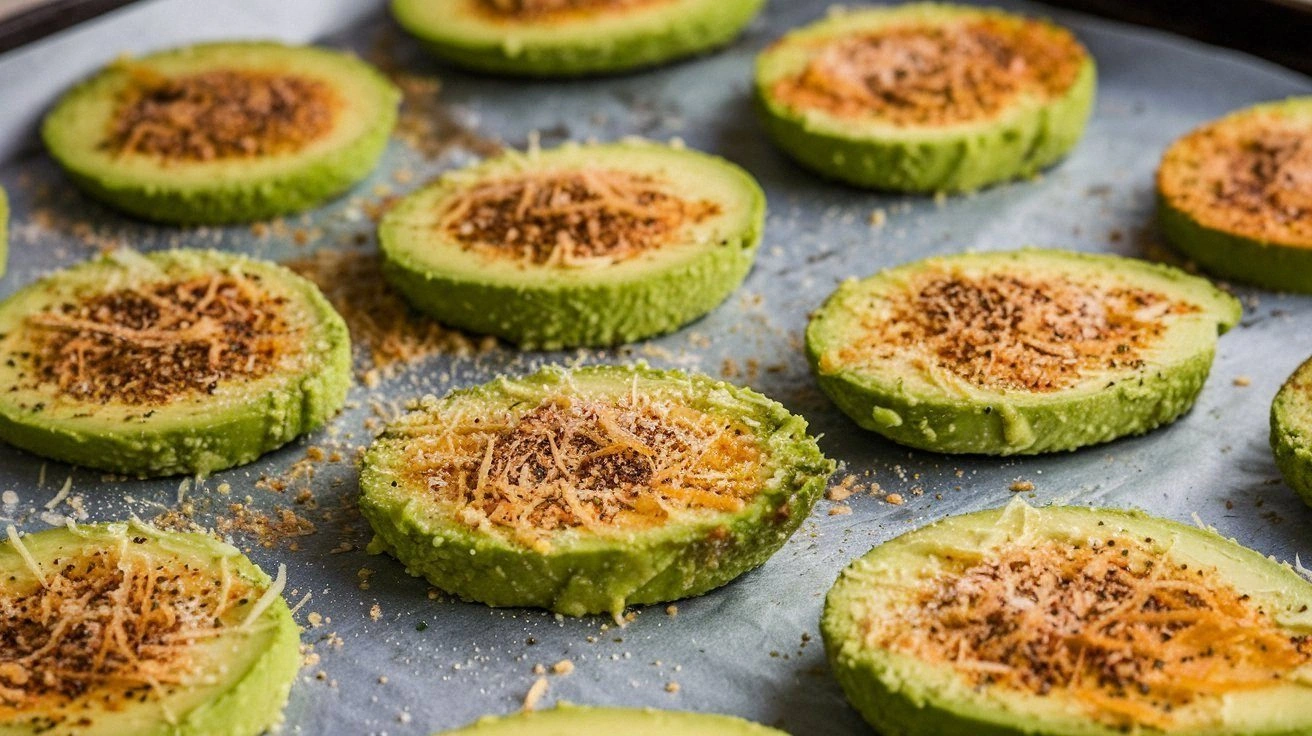
- First, wash the avocados and cut them in half, then remove the pits. Slice the flesh into thin, uniform rounds—about 1/8 inch thick. The thinner you slice, the crispier the chips will become. A mandoline slicer can make this step faster and more precise.
- In a shallow bowl, whisk together the all‑purpose flour, smoked paprika, garlic powder, cayenne pepper, and a pinch of sea salt. This dry mix is the foundation of the coating. If you’re using a gluten‑free flour, add a teaspoon of baking powder for extra lift.
- In a separate bowl, combine the olive oil and lemon juice. The oil helps the coating adhere to the avocado, while the lemon juice adds brightness and prevents the avocado from browning too quickly. Whisk until the mixture is smooth.
- Dip each avocado slice into the oil mixture, ensuring both sides are coated. Then dredge the slice in the flour blend, pressing gently so the flour sticks. Shake off any excess flour—too much will make the chips heavy.
- Heat a non‑stick skillet over medium heat. Add a splash of olive oil to coat the pan, and let it heat until shimmering but not smoking. Place the coated avocado slices in a single layer, making sure they don’t overlap. This step is crucial for even cooking.
- Cook the slices for about 3–4 minutes on each side, or until they develop a golden brown crust. The edges should lift slightly, indicating that the coating is crisping. Keep an eye on the temperature; if the pan gets too hot, the coating will burn before the avocado cooks through.
- Once golden, transfer the chips to a wire rack set over a baking sheet to drain excess oil. This step keeps the chips from becoming soggy and ensures they stay crisp as they cool.
- Let the chips cool for a minute or two. The residual heat will finish the crisping process. Serve immediately for maximum crunch, or store in an airtight container for up to 48 hours.
That’s it — you did it. But hold on, I've got a few more tricks that'll take this to another level. These insider tips will help you achieve the perfect crunch every time and avoid common pitfalls.
Insider Tricks for Flawless Results
The Temperature Rule Nobody Follows
Many people underestimate the importance of pan temperature. The ideal temperature is medium heat—too low, and the chips will absorb excess oil; too high, and they’ll burn before the interior cooks. A quick test is to drop a single slice into the pan; if it sizzles immediately and starts to brown within seconds, you’re good to go. If it drips and slows down, dial back the heat.
Why Your Nose Knows Best
Your sense of smell is the ultimate guide to doneness. As the chips cook, the aroma will shift from raw avocado to a toasted, nutty scent. When you smell the first hint of caramelization, it’s a sign the coating is crisping. Trust your nose—don’t rely solely on the color, as different ovens and pans can produce varying shades.
The 5‑Minute Rest That Changes Everything
After cooking, let the chips rest on a wire rack for exactly five minutes. This short rest allows the steam to escape, preventing the chips from becoming soggy. It also gives the coating a chance to firm up, giving you that satisfying snap when you bite into them. I’ve found that chips that rest for longer tend to lose their crunch, so keep the rest time short.
Use a Paper Towel Stack
Place a stack of paper towels underneath the wire rack. The towels will absorb any excess oil that drips onto the baking sheet, keeping the chips crisp. If you’re serving them immediately, you can skip the paper towels, but for storage or reheating, this trick keeps them from turning greasy.
Reheat for Freshness
If you need to reheat the chips, do so in a hot oven at 350°F (175°C) for about five minutes. Avoid the microwave, as it tends to steam the chips and ruin the crunch. A quick oven blast restores the crispness without overcooking.
Creative Twists and Variations
This recipe is a playground. Here are some of my favorite ways to switch things up:
Cheesy Avocado Crunch
Sprinkle grated Parmesan or cheddar cheese over the coated slices before cooking. The cheese melts slightly, creating a gooey, savory layer that pairs beautifully with the avocado’s creaminess.
Spicy Sriracha Drizzle
After the chips are cooked, drizzle a thin stream of sriracha over them. The heat from the sriracha adds a bold kick that contrasts with the mild avocado flavor.
Herb‑Infused Delight
Add dried herbs like oregano or thyme to the flour blend. The herbs give a fragrant, earthy note that elevates the overall taste profile.
Sweet & Salty Surprise
Dust the finished chips with a light sprinkle of powdered sugar and a pinch of sea salt. The sweet-salty combination is a crowd‑pleaser, especially for kids.
Mediterranean Twist
Replace the smoked paprika with za’atar and add a splash of olive oil after cooking. The Mediterranean flavors give the chips a distinct, aromatic finish.
Citrus Burst
Finish the chips with a squeeze of fresh lime or orange juice. The citrus brightness cuts through the richness and adds a refreshing zing.
Storing and Bringing It Back to Life
Fridge Storage
Store the cooled chips in an airtight container at room temperature for up to 48 hours. The airtight environment prevents moisture from seeping in, keeping the chips crisp. Avoid storing them in the refrigerator, as the cool, humid air can cause the chips to soften.
Freezer Friendly
For longer storage, place the chips on a parchment‑lined tray and freeze for up to 2 weeks. Once frozen, transfer them to a freezer bag. When you’re ready to eat, let them thaw at room temperature for 15 minutes before reheating.
Best Reheating Method
Reheat the chips in a preheated oven at 350°F (175°C) for 5 minutes. Add a tiny splash of water before reheating to create steam that helps restore the crispness. Avoid microwaving, as it will steam the chips and make them soggy.