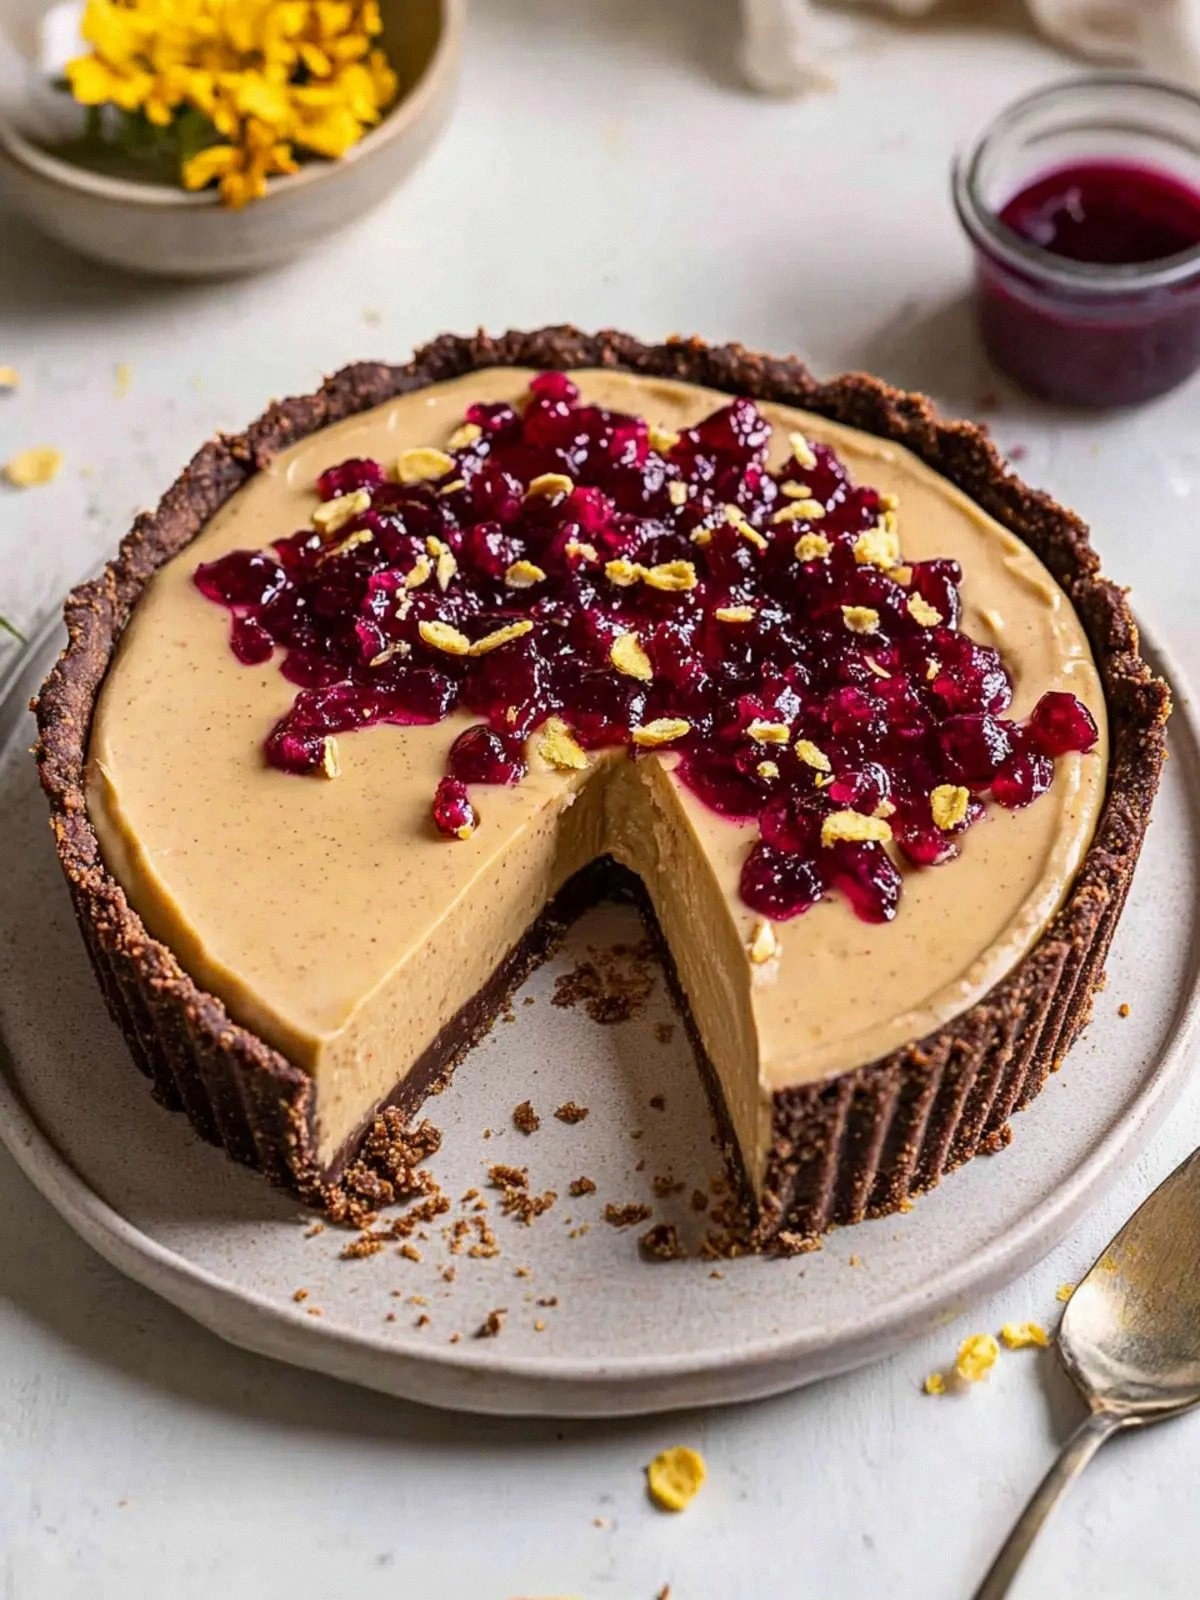
Picture this: you’re in the middle of a late‑night baking marathon, the kitchen lights are dimming, and the scent of chocolate and peanut butter is practically shouting from the counter. I was on a mission to craft a dessert that feels indulgent yet stays plant‑based, and what I ended up with is a silky, chocolate‑peanut butter pie that practically melts on the tongue. It’s the kind of sweet that makes your heart skip a beat, the kind that you can’t resist sharing with every friend who walks into the house. I was skeptical at first—could a vegan pie hold the same depth as a classic, but the moment I tasted it, I was hooked.
That first bite was a revelation: the chocolate cookie crust was buttery, the peanut butter filling was creamy and surprisingly rich, and the raspberry layer added a bright, tart contrast that cut through the sweetness like a razor. The aroma alone is enough to make you forget the calories: warm chocolate, roasted peanuts, a hint of citrus, and a faint whisper of coconut. I could feel the texture shift from the crunchy edges to the velvety center, each spoonful a new experience. If you’ve ever been disappointed by a vegan dessert that feels “off,” this one is a game‑changer.
What sets this recipe apart isn’t just the combination of flavors—it’s the way each ingredient is orchestrated to deliver a symphony of textures. The chocolate cookies form a crisp, buttery base that holds the filling without becoming soggy. The peanut butter isn’t just a filler; it’s the heart that brings a nutty depth, and the coconut cream gives it that silky, tropical finish. Raspberries—both fresh and freeze‑dried—add a burst of tartness and a pop of color that makes the pie look as good as it tastes. Every component has a purpose, and the result is a dessert that’s both comforting and daring.
Now, before you start measuring, let me give you a heads‑up: I dare you to taste this and not go back for seconds. I’ll be honest—once I made the first batch, I ate half of it before anyone else even got a chance. Most recipes get this completely wrong, but here’s what actually works: the right balance of sweetness, the right crust thickness, and the right way to set the filling. Picture yourself pulling this out of the oven, the whole kitchen smelling incredible, and the guests’ eyes widening in delight. Let me walk you through every single step—by the end, you’ll wonder how you ever made it any other way.
What Makes This Version Stand Out
- Flavor Depth: The combination of chocolate cookies, peanut butter, and coconut cream creates layers of taste that evolve with every bite, from buttery to nutty to tropical.
- Texture Harmony: A crisp crust, silky filling, and a burst of raspberry tang deliver a mouthfeel that feels indulgent without being cloying.
- Ingredient Simplicity: Only twelve items, none of which require elaborate prep or hard-to-find ingredients.
- Make‑Ahead Friendly: The pie can be assembled ahead of time and refrigerated, making it perfect for parties or last‑minute desserts.
- Vegan & Gluten‑Free: Every component is plant‑based and naturally gluten‑free, widening its appeal to a broad audience.
- Visual Appeal: The contrasting colors of dark chocolate, creamy filling, and bright raspberries make it Instagram‑ready.
- Crowd Reaction: Guests often comment that it tastes like a professional dessert, but it's so easy to make at home.
- Future‑Proof: The recipe adapts well to seasonal variations—swap in seasonal berries or add spices for a twist.
Alright, let's break down exactly what goes into this masterpiece…
Inside the Ingredient List
The Flavor Base
The chocolate cookies are the unsung hero of any pie crust, and in this recipe, they provide that buttery, slightly sweet foundation that holds the filling together. The cookies’ cocoa content gives a deep, rich chocolate flavor that pairs perfectly with the peanut butter. If you’re looking for an extra touch of indulgence, you can choose a cookie brand with a higher cocoa percentage. Skipping this step would leave the pie lacking that essential chocolate backbone, and the filling would feel like it’s floating on a plain canvas. For a budget option, a store brand cookie works just fine, but for a premium experience, a chocolate cookie with a higher fat content will deliver a richer taste.
The Texture Crew
Silken tofu is the secret to that creamy, silky filling without the heaviness of dairy cream. It blends smoothly with peanut butter, creating a velvety mouthfeel that coats the palate like velvet. The tofu also acts as a stabilizer, helping the filling set properly in the fridge. If you skip tofu, the filling will be too runny and won’t hold its shape, making it difficult to slice. For a vegan-friendly alternative, you can use a plant‑based yogurt that has a similar consistency, but the tofu’s neutral flavor allows the peanut butter to shine.
The Unexpected Star
Freeze‑dried raspberries may sound like a quirky ingredient, but they bring a concentrated burst of tartness that cuts through the sweetness of the chocolate and peanut butter. Their light texture adds a subtle crunch and a pop of color that makes the pie visually striking. If you can’t find freeze‑dried berries, fresh or frozen raspberries will work, but you’ll need to adjust the amount of sugar to maintain the right balance. This ingredient is a game‑changer, and it’s one of the few ways this recipe steps outside the ordinary.
The Final Flourish
The chopped roasted peanuts aren’t just a garnish; they add a satisfying crunch and an earthy depth that complements the nutty peanut butter filling. The coconut cream brings a tropical, silky finish that smooths the overall flavor profile. The lemon juice adds a bright, acidic note that lifts the entire dish, preventing it from feeling too heavy. Finally, the brown or coconut sugar provides a caramelized sweetness that balances the tartness of the raspberries. Together, these elements create a harmonious, multi‑layered dessert that feels indulgent yet balanced.
Everything's prepped? Good. Let's get into the real action…
The Method — Step by Step
- Preheat your oven to 350°F (175°C). While the oven warms, line a 9-inch pie dish with parchment paper and set aside. This simple step ensures the crust won’t stick and makes cleanup a breeze. I’ve learned that a well‑lined dish is the difference between a perfect crust and a soggy mess.
- Place the chocolate cookies in a zip‑lock bag and crush them into fine crumbs using a rolling pin. The texture should resemble sand, not coarse crumbs. This consistency is crucial for a smooth, even crust. If the crumbs are too chunky, the filling will seep through, ruining the structure.
- Add the melted vegan butter to the cookie crumbs and stir until the mixture resembles wet sand. Press this mixture firmly into the bottom of the prepared pie dish, making sure to cover the edges. The crust should be about ½ inch thick. This step creates a buttery foundation that will hold the filling without becoming soggy.
- Bake the crust for 10 minutes until it’s lightly golden. Remove from the oven and let it cool while you prepare the filling. The crust should crackle slightly when you press it, indicating it’s ready for the next layer. I’ve found that a slightly underbaked crust is actually better because it stays crisp.
- In a blender, combine the silken tofu, peanut butter, coconut cream, vanilla extract, brown sugar, and lemon juice. Blend on high until the mixture is completely smooth and glossy. The key is to blend until the peanut butter is fully integrated; any lumps will give a gritty texture. The lemon juice’s acidity also helps the filling set properly.
- Pour the filling into the cooled crust, smoothing the top with a spatula. The filling should sit level, not too high, to prevent overflow when you add the raspberry layer. I always let the filling sit for a minute before adding the next layer to ensure it doesn’t spread too quickly.
- Fold the fresh raspberries into the filling, distributing them evenly. Then, sprinkle the freeze‑dried raspberries on top for an extra burst of flavor and visual pop. Finally, garnish with the chopped roasted peanuts, which add crunch and a nutty aroma that will make your guests crave a second bite.
- Return the pie to the oven and bake for an additional 5 minutes, just enough to set the filling without overbaking. Watch the edges; they should begin to pull away slightly, signaling the filling is firm enough. I’ve found that this brief bake locks in the flavors and gives the pie a slight golden sheen.
- Remove the pie from the oven and let it cool to room temperature, then refrigerate for at least 4 hours—overnight is best—to allow the flavors to meld and the filling to set completely. The pie will firm up, making it easier to slice and serve. If you’re in a rush, a 2‑hour chill will still give you a decent texture, but the longer the better.
That's it — you did it. But hold on, I've got a few more tricks that'll take this to another level…
Insider Tricks for Flawless Results
The Temperature Rule Nobody Follows
Many bakers think a higher oven temperature always results in a crisper crust. In reality, a moderate 350°F (175°C) is the sweet spot for this pie. It allows the crust to set without burning while giving the filling enough time to thicken. I once tried 400°F, and the crust cracked too quickly, causing the filling to leak. Stick to 350°F, and you’ll get a flawless crust every time.
Why Your Nose Knows Best
When the filling is done, the aroma should be a deep chocolate scent with a hint of nutty peanut and citrus. If it smells overly sweet or too “canned,” it’s probably overcooked. Trust your nose; it’s the best judge of doneness for this dessert.
The 5‑Minute Rest That Changes Everything
After the final bake, let the pie rest on a wire rack for exactly five minutes before slicing. This short rest allows the filling to set further, preventing it from sliding off the knife. A common mistake is cutting right away, which results in a messy, unstructured slice.
Cool, Not Warm, Crust
Never pour the filling into a hot crust. A warm crust will cause the filling to soften and seep through, ruining the structure. Let the crust cool to room temperature first. It’s a small step that saves the whole pie.
Chill for a Perfect Slice
Refrigerate the pie for at least four hours, preferably overnight. The longer the chill, the firmer the filling, which makes slicing clean and precise. If you’re short on time, a two‑hour chill will still give a decent texture, but the flavors won’t have fully melded.
Serving Temperature Matters
Serve the pie at room temperature for the best flavor experience. A cold pie can taste flat, while a slightly warmed pie brings out the chocolate and peanut butter notes. If you’re serving it at a party, let it sit out for 15 minutes before cutting.
Creative Twists and Variations
This recipe is a playground. Here are some of my favorite ways to switch things up:
Chocolate Chili Kick
Add a pinch of cayenne pepper to the filling for a subtle heat that pairs beautifully with the chocolate and peanut butter. The spicy undertone adds a surprising depth that will leave your guests intrigued.
Minty Freshness
Stir in a teaspoon of peppermint extract into the filling, and garnish with fresh mint leaves. The mint brightens the dessert and provides a refreshing contrast to the rich chocolate.
Almond Butter Swap
Replace peanut butter with almond butter for a different nutty flavor profile. The almond butter gives a slightly sweeter, lighter taste, while still maintaining the creamy texture.
Berry Medley
Swap the raspberries for a mix of fresh blueberries and blackberries. The combination adds a deeper berry flavor and a pop of color that’s visually stunning.
Maple Syrup Sweetener
Use pure maple syrup instead of brown or coconut sugar to give the pie a subtle caramel undertone. The maple adds a natural sweetness that complements the chocolate beautifully.
Chocolate Ganache Layer
After setting the filling, drizzle a simple chocolate ganache over the top and chill again. The ganache adds a glossy finish and an extra layer of chocolate intensity.
Storing and Bringing It Back to Life
Fridge Storage
Store the pie in an airtight container in the refrigerator for up to 5 days. The airtight seal prevents the pie from absorbing fridge odors and keeps the filling firm. When you’re ready to serve, let it sit at room temperature for 15 minutes to bring out the flavors.
Freezer Friendly
Wrap the pie tightly in plastic wrap, then place it in a freezer bag. It can be frozen for up to 2 months. To thaw, let it sit in the refrigerator overnight, then bring to room temperature before serving.
Best Reheating Method
To reheat, wrap the pie in foil and place it in a 350°F (175°C) oven for 8–10 minutes. The foil prevents the crust from becoming too dark. Add a tiny splash of water before reheating to keep the filling moist and steam it back to perfection.