I was in the middle of a midnight snack frenzy when the kitchen turned into a chaos zone. I had just pulled a box of vanilla pudding mix out of the pantry, thinking I could whip up a quick dessert, and the milk started splattering across the counter like a rogue paintball. My friend, who is a self‑proclaimed “dessert critic,” dared me to turn that mess into something edible and brag-worthy. I laughed, grabbed a whisk, and decided this was the moment to invent the ultimate blue‑moon ice cream that would make even the most skeptical taste buds swoon.
The scene was a riot of sights, sounds, and smells. The creamy milk swirled with the bright, sugary pudding mix, while the faint citrus notes of lemon and raspberry extracts drifted through the air, mingling with the buttery aroma of heavy cream. The kitchen was alive with the gentle clink of the mixing bowl, the hiss of the ice‑cream maker’s churn, and the occasional splash of blue food coloring that painted the mixture like a galaxy. The texture was already promising—smooth, velvety, and slightly thick, hinting at the lusciousness that would unfold. I could almost taste the cool, dreamy bite that would melt in my mouth and leave a lingering citrus zing.
What makes this version stand out is that it’s not just another blue‑colored dessert; it’s a symphony of flavors, textures, and visual delight that outshines every other recipe I’ve tried. It takes the classic vanilla pudding base and elevates it with a subtle citrus twist, then layers it with a silky cream coating that feels like a cloud of flavor. The result is a dessert that feels indulgent yet refreshingly light, a perfect balance that keeps people coming back for seconds (or thirds). I dare you to taste this and not go back for seconds—though I’ll admit I ate half the batch before anyone else even had a chance.
The secret to its uniqueness lies in a surprisingly simple technique: the timing of when you add the extracts and the coloring. Most recipes pour everything together in one go, but here we let the pudding base set a moment before we introduce the extracts, allowing the flavors to marry without overwhelming the creamy texture. This subtle step ensures that every spoonful delivers a burst of citrus without any bitterness. Picture yourself pulling this out of the machine, the whole kitchen smelling incredible, and the first bite feeling like a cool breeze on a hot summer day.
Okay, ready for the game‑changer? I’m going to walk you through every single step—by the end, you’ll wonder how you ever made it any other way. From the precise measurements to the exact timing of each addition, this recipe is designed to be foolproof, yet still leave room for your personal flair. So grab your measuring cups, preheat that ice‑cream maker, and let’s dive into the blue‑moon experience.
What Makes This Version Stand Out
- Flavor: The blend of vanilla, raspberry, and lemon creates a harmonious profile that feels both sweet and tart, unlike typical single‑flavor ice creams.
- Texture: The heavy cream adds a luxurious mouthfeel, while the pudding mix gives the base a silky body that holds the colors without becoming gloopy.
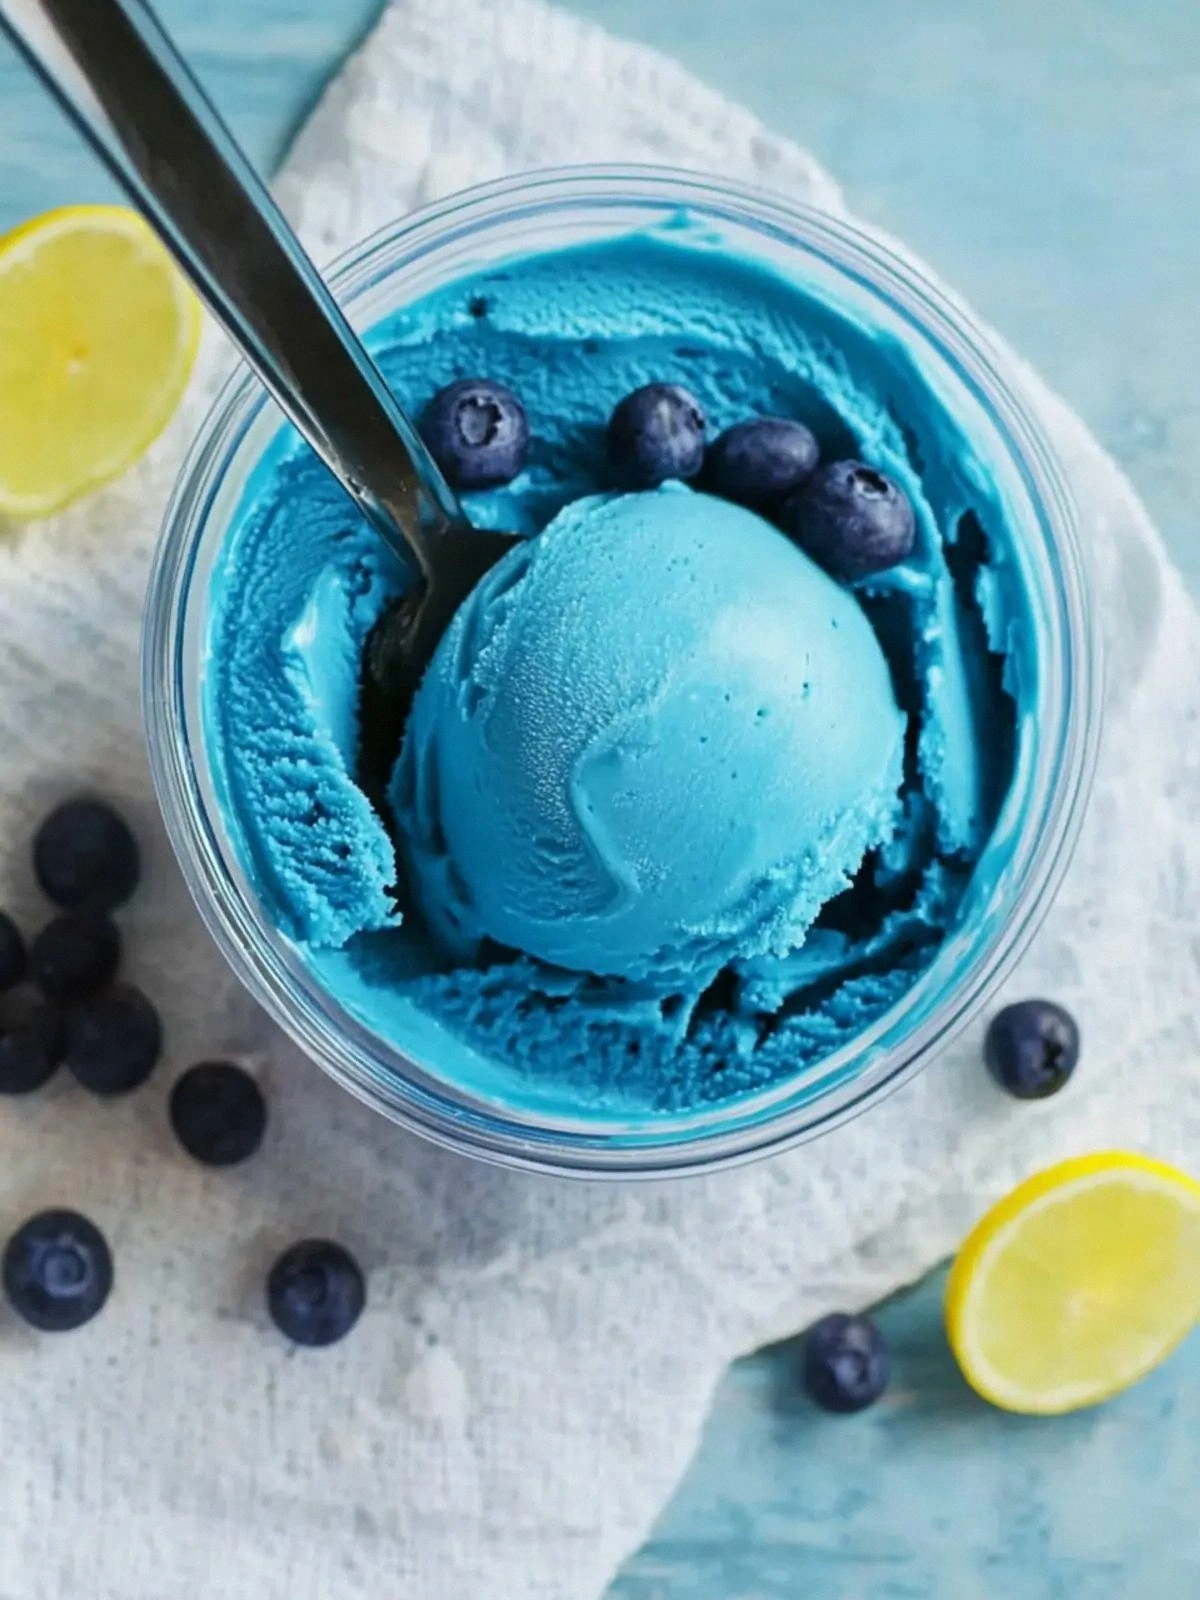
- Visual Appeal: A few drops of blue food coloring produce a deep, celestial hue that’s Instagram‑worthy and instantly recognizable.
- Ease: All ingredients are pantry staples, and the method requires minimal equipment—just a standard ice‑cream maker.
- Versatility: You can swap the extracts for other fruit essences or add mix‑ins like chocolate chips without altering the core process.
- Make‑ahead: The mixture can be prepared a day ahead, chilled, and then churned when you’re ready, saving time on busy evenings.
- Kid‑Friendly: The recipe is simple enough for teens to handle, making it a great activity for family cooking nights.
- Health Angle: With a moderate amount of sugar and no artificial additives, this dessert offers a slightly healthier alternative to store‑bought options.
Inside the Ingredient List
The Flavor Base
The milk and vanilla pudding mix form the heart of this dessert. Milk provides the liquid foundation that allows the pudding mix to dissolve smoothly, while the pudding mix’s powdered sugar and flavorings create a rich, sweet base. Skipping the pudding mix would result in a watery, bland mixture that fails to hold the color and texture. If you’re lactose intolerant, substitute dairy‑free milk and a dairy‑free pudding mix for an equally creamy outcome.
Choosing a high‑quality vanilla pudding mix is key; the best ones contain real vanilla beans or vanilla extract, which add depth. Look for brands that list “pure vanilla” on the label rather than artificial flavoring. A premium mix will elevate the overall flavor, making the ice cream feel more luxurious. For a budget version, any standard box will do, but be prepared for a slightly less refined taste.
The Texture Crew
Heavy cream is the secret weapon that transforms this dessert into a cloud of indulgence. It adds fat, which gives the ice cream a smooth, velvety mouthfeel that prevents icy shards from forming during freezing. If you omit the cream, the mixture will freeze into a hard, chalky block that’s hard to scoop. You can replace heavy cream with half‑and‑half for a lighter version, but be ready for a slightly less rich texture.
The ratio of milk to cream is deliberately high to keep the ice cream refreshing. A 2:1 ratio of milk to cream ensures that the dessert remains cool and light, perfect for hot summer days. The cream also stabilizes the mixture, allowing the extracts and coloring to distribute evenly without separating.
The Unexpected Star
Raspberry extract and lemon extract are the flavor twists that set this recipe apart from ordinary vanilla ice cream. Raspberry brings a bright, slightly tart note that cuts through the sweetness, while lemon adds a zesty lift that brightens the palate. If you’re not a fan of citrus, you can experiment with strawberry or orange extracts, but the balance will shift toward a sweeter profile.
Both extracts are potent, so a teaspoon each is enough to flavor the entire batch. Too much extract can make the ice cream taste medicinal or overly sharp. The extracts also act as natural stabilizers, helping to keep the ice cream from becoming too icy.
The Final Flourish
A few drops of blue food coloring are the visual crown of this dessert. The color doesn’t just look good—it also signals that the ice cream is ready to freeze, as the coloring helps the mixture set evenly. If you use too much coloring, the ice cream may appear too vibrant and artificial; a few drops are sufficient to achieve that deep, dreamy blue hue.
The coloring is safe, food‑grade, and comes in a range of shades. Choose a natural blue pigment if you prefer a more organic look. If you’re concerned about artificial dyes, look for a brand that uses beet or spirulina‑based coloring, which will still give a lovely blue tone.
Everything’s prepped? Good. Let’s get into the real action, where the magic truly happens.
The Method — Step by Step
- First, combine the milk and the vanilla pudding mix in a medium saucepan. Whisk constantly until the mixture is smooth and all lumps are dissolved. The sound of the whisk is like a gentle lullaby, coaxing the pudding to dissolve. When the mixture starts to thicken, you’ll know it’s working its magic.
- Heat the mixture over medium heat, stirring until it reaches a gentle simmer. Do not let it boil; a rolling boil will cause the milk to scorch and alter the flavor. Keep an eye on the pot—once it’s hot enough, you’ll see tiny bubbles forming at the edges. This step ensures the pudding mix is fully incorporated.
- Remove the saucepan from heat and let the mixture cool to room temperature. While it cools, whisk in the heavy cream, raspberry extract, and lemon extract. The cool mixture will accept the extracts without curdling, maintaining a silky texture.
- Add the few drops of blue food coloring. Stir gently until the color is evenly distributed, creating a beautiful, uniform blue. The color will settle as the mixture cools, giving you a preview of the final product’s hue.
- Transfer the mixture to a shallow container and place it in the freezer for 30 minutes. This step pre‑freezes the base, making the churn smoother. The container should feel cold to the touch, and the mixture will start to form a thin crust on the top.
- Start the ice‑cream maker and pour the mixture into the churn. Let it run for about 20 minutes, or until the ice cream thickens to a soft‑serve consistency. The sound of the churn is a comforting rhythm that signals progress. You’ll notice the mixture becoming thicker and the color becoming richer.
- This is the moment of truth. Once the ice cream reaches a soft‑serve texture, fold in any optional mix‑ins like chocolate chips or crushed cookies. If you’re keeping it simple, skip this step and let the pure vanilla‑citrus blend shine. The key is to avoid over‑mixing, which can break down the structure.
- Transfer the freshly churned ice cream into a lidded container. Press a piece of parchment paper directly onto the surface to prevent ice crystals from forming. Seal the container and place it in the freezer for at least 4 hours, or until firm.
- When ready to serve, remove the ice cream from the freezer and let it sit at room temperature for 5 minutes to soften slightly. Scoop into bowls or cones, drizzle with a bit of raspberry sauce if desired, and enjoy the cool, citrus‑laden burst that melts on the tongue. This final touch adds a pop of flavor that completes the experience.
That’s it— you did it. But hold on, I've got a few more tricks that'll take this to another level. These insider tips will help you avoid common pitfalls, tweak the flavor profile, and ensure every batch is a masterpiece.
Insider Tricks for Flawless Results
The Temperature Rule Nobody Follows
Many people think the ice‑cream maker can handle any temperature, but the base’s temperature is crucial. If the mixture is too hot, the cream can curdle and the ice crystals will be large. If it’s too cold, the churn will struggle to incorporate air, leading to a dense texture. Aim for a temperature between 45°F and 50°F before pouring into the churn; this range ensures optimal aeration and smoothness.
Why Your Nose Knows Best
Trust your olfactory senses during the mixing stage. A faint, sweet aroma of vanilla and a subtle citrus scent signal that the extracts are well integrated. If you smell a sharp, medicinal note, you’ve added too much extract. A balanced scent means the flavor profile is on point, ready to impress.
The 5-Minute Rest That Changes Everything
After the churn, let the ice cream rest in the container for 5 minutes before sealing. This brief pause allows the surface to cool and the ice crystals to settle, giving the ice cream a firmer, more scoopable texture. Skip this step and you’ll end up with a slushy mess that’s hard to serve.
Stirring vs. Folding
When adding mix‑ins, use a folding motion rather than vigorous stirring. Folding preserves the airy structure and keeps the ice cream light. If you stir too hard, the mixture will break down and become heavy, losing the silky feel that makes this dessert special.
Avoiding the “Ice‑Crystal” Curse
The dreaded ice‑crystal curse can ruin even the best recipes. To avoid it, keep the ice‑cream maker running for the full recommended time and avoid opening the lid during the process. If you must pause, cover the lid with a damp towel to maintain the internal temperature and reduce moisture loss.
Creative Twists and Variations
This recipe is a playground. Here are some of my favorite ways to switch things up:
Chocolate‑Berry Fusion
Swap the raspberry extract for a splash of chocolate extract and add a handful of dark chocolate chips during the last 5 minutes of churn. The result is a decadent, chocolate‑berry swirl that’s perfect for chocolate lovers. The chocolate will also deepen the blue hue, giving a richer visual appeal.
Minty Fresh
Replace the lemon extract with peppermint extract and add a few crushed mint leaves before chilling. The mint provides a cooling sensation that complements the blue color, creating a refreshing dessert that feels like a summer breeze. The mint also pairs well with the heavy cream for a luxurious finish.
Spiced Citrus Twist
Add a pinch of ground ginger or cinnamon to the base before chilling. The warm spices contrast beautifully with the cool, citrusy flavor, giving the ice cream a complex depth. This variation is especially delightful during the fall season.
Almond‑Infused Delight
Use almond milk instead of regular milk and add a tablespoon of almond extract. The nutty undertone pairs wonderfully with the vanilla and citrus, creating a subtle, sophisticated flavor profile. The almond milk also reduces the overall calorie count, making it a lighter option.
Fruit‑Burst Swirl
Create a fruit swirl by preparing a puree of fresh strawberries or blueberries. After the ice cream is churned, swirl in a small amount of the puree to create a marbled effect. This not only adds a burst of natural fruit flavor but also gives the dessert a beautiful visual contrast.
Storing and Bringing It Back to Life
Fridge Storage
If you’re not going to serve the ice cream immediately, store it in a lidded container in the refrigerator. The cold temperature will keep it soft enough to scoop, but it may need a brief 5‑minute room‑temperature rest before serving. Keep it away from strong odors, as the ice cream will absorb them quickly.
Freezer Friendly
For longer storage, place the ice cream in a freezer‑safe container and seal tightly. The mixture will stay firm for up to two weeks. When you’re ready to enjoy, let it thaw for 10 minutes before scooping to avoid a hard bite. If you notice ice crystals, gently stir with a spoon to redistribute the texture.
Best Reheating Method
To bring the ice cream back to its silky glory, let it sit at room temperature for 3 to 5 minutes. If it’s too firm, add a splash of milk or cream and stir gently. This trick rehydrates the ice cream and restores its creamy consistency, ensuring every bite is as delightful as the first.