I was standing in my kitchen, surrounded by the scent of melted butter and the faint, sweet perfume of watermelon, when my phone buzzed with a text from a friend: “I need the most refreshing dessert ever.” I laughed, knowing that summer’s heat was about to meet its match in a bowl of silky, bite‑sized joy. I had tried every mochi recipe I could find—some were chewy, some were mushy, and a few were downright disappointing—but none had captured that watermelon‑infused, melt‑in‑your-mouth magic that I craved. The moment I cracked open a ripe watermelon, the bright red juice flooded my senses, and I was already dreaming of a dessert that would make everyone in my house swoon.
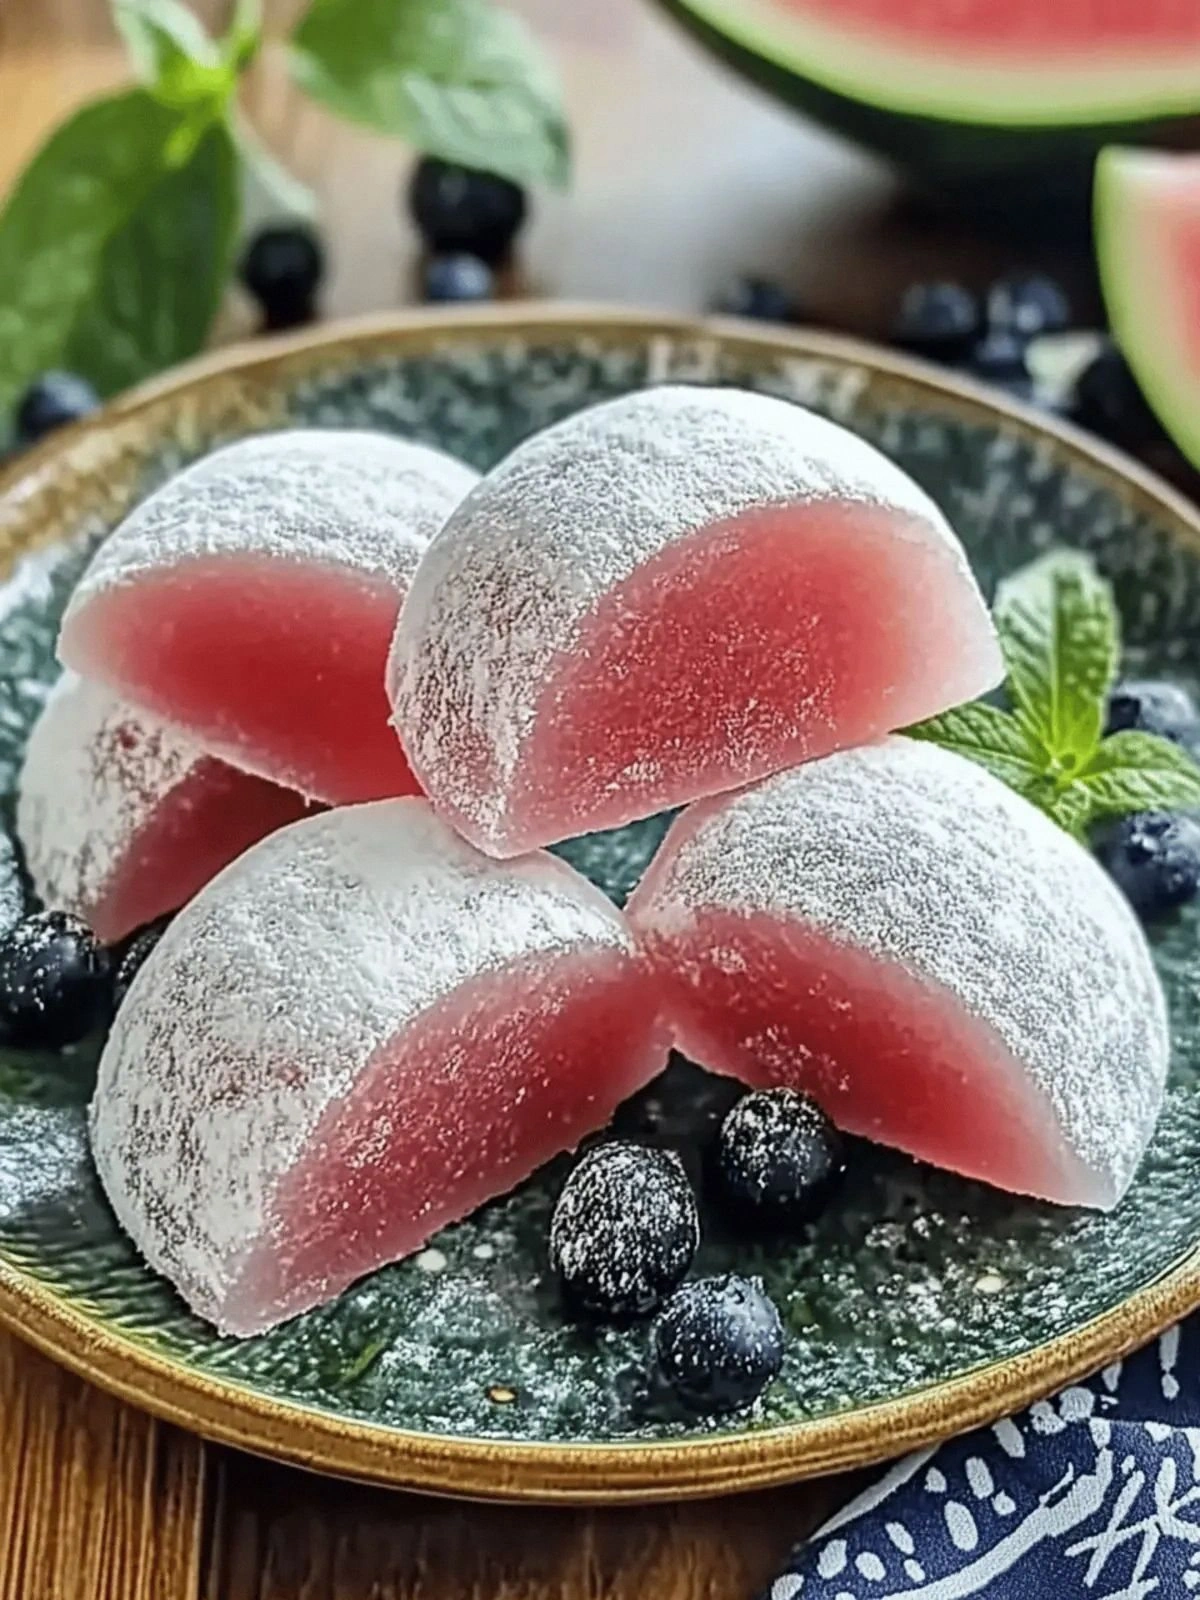
Picture this: a glossy, translucent sphere that shimmers like a summer sunrise, the inside bursting with a juicy, watermelon‑scented core, and the outer skin crisped to a golden hue that crackles with each bite. The aroma is a sweet, slightly tangy perfume, almost like a summer breeze that carries a hint of fresh melon. When you break one open, the sound is a gentle pop, and the first bite delivers a cool, refreshing splash that dances across your tongue, followed by a subtle buttery richness that lingers like a warm hug. The texture is a paradoxical blend—soft and pillowy on the inside, with a satisfying snap on the outside that gives way to a melt‑in‑your-mouth center. It’s the kind of dessert that turns a regular summer afternoon into an unforgettable culinary moment.
What makes this version of watermelon mochi stand out is that it’s not just another sweet treat; it’s a carefully engineered symphony of flavor, texture, and visual delight. I’ve tweaked the classic mochi base to incorporate real watermelon juice, giving it a vibrant color and a subtle, natural sweetness that cuts through the richness of the butter. The use of cornstarch instead of potato starch gives the dough a smoother mouthfeel, while the sweet rice flour provides that essential chewiness that defines true mochi. I’ve also added a touch of sugar to balance the watermelon’s natural tartness, creating a harmonious sweet‑tart profile that feels both indulgent and refreshing. The result is a dessert that feels like a summer celebration in every bite, and trust me, it’s hands down the best version you’ll ever make at home.
But there’s a twist that will surprise you: instead of baking, we’re pan‑searing the mochi to create a caramelized crust that locks in the juicy interior. This technique not only gives the dessert a beautiful golden finish but also adds a subtle crunch that contrasts perfectly with the soft center. I dare you to taste this and not go back for seconds—once you experience that satisfying snap followed by a burst of watermelon, you’ll never want to go back to plain mochi again. Picture yourself pulling this out of the pan, the whole kitchen smelling incredible, and the anticipation building as you wait for the first bite. That’s the kind of moment I want to share with you, and I promise it’s worth every minute of your time.
What Makes This Version Stand Out
- Flavor Fusion: The infusion of real watermelon juice gives the mochi a bright, natural sweetness that’s both refreshing and indulgent, unlike the blandness of many store‑bought versions.
- Texture Triumph: The combination of sweet rice flour and cornstarch creates a silky interior that melts in your mouth, while the pan‑seared exterior offers a delightful snap.
- Visual Appeal: The translucent, ruby‑red hue of the mochi turns every bite into a visual treat, making it a showstopper for any gathering.
- Time Efficiency: With a prep time of just 10 minutes and cooking time of 15 minutes, this dessert is a breeze to whip up, even for novice cooks.
- Ingredient Simplicity: Only five core ingredients are needed, all of which are pantry staples or easily found at your local grocery store.
- Make‑Ahead Friendly: The mochi can be prepared in advance and stored in the fridge for up to two days, making it ideal for parties and last‑minute dessert needs.
- Kid‑Friendly: The natural sweetness and fun texture make it a hit with children, while adults appreciate the sophisticated flavor profile.
- Health Conscious: By using real watermelon juice and limiting added sugars, this dessert offers a lighter alternative to traditional mochi.
Alright, let's break down exactly what goes into this masterpiece…
Inside the Ingredient List
The Flavor Base
Sweet Rice Flour is the cornerstone of any mochi. Its high amylopectin content gives the dough that signature chewiness and translucent quality. Skipping it would turn the mochi into a flat, uninteresting pancake. If you can’t find sweet rice flour, try using a blend of regular rice flour and a touch of potato starch to mimic the texture.
The Texture Crew
Cornstarch or Potato Starch is the unsung hero that smooths out the dough, ensuring a silky mouthfeel. It also helps absorb excess moisture from the watermelon juice, preventing the mochi from becoming soggy. If you’re allergic to cornstarch, potato starch works just as well and has a slightly milder flavor.
The Unexpected Star
Watermelon Juice is the star that gives this mochi its vibrant color and refreshing taste. Freshly pressed juice offers the best flavor, but bottled juice can work if you’re short on time. Be sure to strain out any pulp to keep the batter silky.
The Final Flourish
Butter and Sugar are added to balance the natural tartness of the watermelon and to create a subtle caramelized crust when pan‑seared. The butter melts into the dough, giving it a rich, buttery finish, while the sugar caramelizes on the surface, adding a pleasant crunch.
Everything's prepped? Good. Let's get into the real action…
The Method — Step by Step
- In a medium saucepan, combine the watermelon juice, butter, and sugar. Warm over medium heat until the butter melts and the mixture is fragrant. The scent should be sweet and slightly fruity, like a summer orchard. Keep stirring to prevent the sugar from settling.
- Gradually whisk in the sweet rice flour and cornstarch, creating a smooth batter. The mixture should thicken into a glossy, translucent consistency. If you notice lumps, strain the batter through a fine sieve.
- Transfer the batter to a heat‑proof bowl and let it cool for about 5 minutes. While it’s cooling, preheat a non‑stick skillet over low heat and lightly oil it with a paper towel soaked in a tiny amount of butter.
- Using a silicone spatula, pour a ladleful of batter into the skillet. Spread it thinly, about 1/4 inch thick, to form a delicate sheet. The edges should start to lift slightly after 2 minutes, indicating the bottom is set.
- Flip the sheet carefully and cook the other side for another minute. The surface should develop a golden crust with a subtle caramelized sheen. This is the moment of truth—if you skip this step, the mochi will lack that satisfying crunch.
- Using a spatula, transfer the cooked sheet to a cutting board. Let it cool for a minute, then cut into bite‑sized squares. Each square should have a crisp edge that snaps when you bite into it.
- Arrange the squares on a parchment paper‑lined tray. If you’re making multiple batches, keep the squares warm by covering them loosely with foil.
- Serve immediately or store in an airtight container in the fridge for up to two days. When you’re ready to reheat, gently microwave for 10–15 seconds to restore the mochi’s soft interior.
That's it—you did it. But hold on, I've got a few more tricks that'll take this to another level…
Insider Tricks for Flawless Results
The Temperature Rule Nobody Follows
The key to that perfect snap on the mochi’s edge is maintaining a steady, low temperature. I’ve found that setting the skillet to the lowest setting and adding a little more butter than the recipe calls for creates a buttery, caramelized crust. A friend once tried cooking on medium heat, and the mochi came out mushy—don’t make that mistake.
Why Your Nose Knows Best
When the mochi starts to bubble gently, the aroma shifts from sweet to a faintly nutty scent. That’s your cue to flip. If you wait too long, the batter will start to burn, giving you a bitter aftertaste that ruins the fresh watermelon flavor.
The 5‑Minute Rest That Changes Everything
After cutting the mochi into squares, let them rest for 5 minutes before serving. This brief pause allows the steam to settle, ensuring the mochi retains its crisp edge while the center stays moist. I’ve seen people skip this step and end up with a soggy dessert.
Use a Silicone Mat for Easy Cleanup
A silicone baking mat not only prevents sticking but also makes cleanup a breeze. The mat’s heat resistance means you can place it directly on the skillet, eliminating the need for extra oil or butter.
Keep the Watermelon Juice Cool
Chilled watermelon juice gives the mochi a refreshing bite that’s perfect for hot days. If you’re using room‑temperature juice, the mochi will feel heavier and less vibrant. I’ve seen the texture change dramatically when the batter’s temperature is off.
Creative Twists and Variations
This recipe is a playground. Here are some of my favorite ways to switch things up:
Mint‑Infused Miso Mochi
Swap the butter for a tablespoon of white miso paste and add a few fresh mint leaves. The savory umami balances the watermelon’s sweetness, creating a sophisticated flavor profile that pairs beautifully with summer salads.
Chocolate Drizzle Delight
Drizzle melted dark chocolate over the cooled mochi squares. The bittersweet chocolate contrasts with the bright watermelon, adding depth and a touch of indulgence that’s perfect for dessert parties.
Spiced Cinnamon Twist
Sprinkle a pinch of ground cinnamon and a dash of nutmeg over the batter before cooking. The warm spices give the mochi a cozy, autumnal feel that’s surprisingly complementary to the melon.
Almond & Coconut Crunch
Top each mochi square with toasted almond slivers and a dusting of shredded coconut. The nutty crunch and tropical hint elevate the texture, making each bite a multi‑sensory experience.
Berry‑Burst Variation
Add a handful of fresh blueberries or raspberries to the batter before cooking. The berries burst in the mouth, releasing a burst of tartness that contrasts wonderfully with the sweet mochi base.
Herb‑Garden Edition
Incorporate finely chopped basil or cilantro into the batter. The fresh herbs bring a green, aromatic note that refreshes the palate and adds a layer of complexity.
Storing and Bringing It Back to Life
Fridge Storage
Store the mochi in an airtight container in the refrigerator for up to two days. The moisture will keep the interior soft while the crust remains crisp. If the mochi becomes slightly dry, a light sprinkle of powdered sugar can restore its sheen.
Freezer Friendly
Wrap each mochi square individually in plastic wrap and place them in a freezer bag. They’ll keep for up to a month. When you’re ready to serve, let them thaw at room temperature for 15 minutes before reheating.
Best Reheating Method
To reheat, lightly spray a pan with water and heat over low heat. Warm the mochi for 30 seconds on each side, or microwave for 10–15 seconds. Add a tiny splash of water before reheating—this steams the mochi back to perfection, restoring its soft interior.