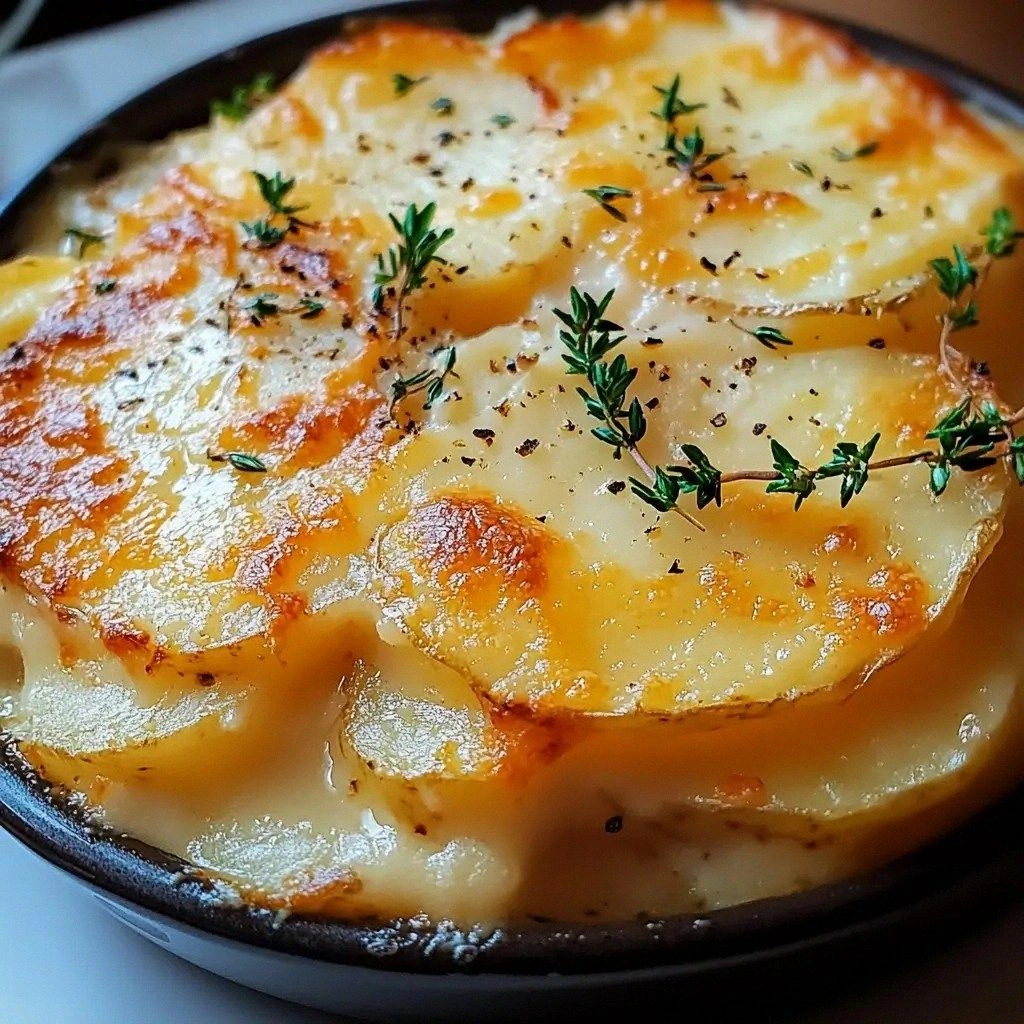
I was standing in my kitchen, staring at a mound of potatoes that had been left to sit on the counter all night, when my friend texted me a challenge: “Make the most unforgettable scalloped potatoes ever.” I laughed, because I’d tried a dozen variations, each promising comfort but delivering only soggy, bland layers. The moment the idea landed, I imagined a dish that would make the oven sigh with anticipation, the scent of butter and garlic drifting like a warm hug. I knew I had to craft something that would not just satisfy hunger but ignite a craving that would keep guests coming back for seconds.
Picture this: a golden crust that crackles with a buttery crunch, underneath a silky, cheese‑laden sauce that oozes like molten caramel. The potatoes themselves are thinly sliced, each layer a translucent sheet that invites the flavors to mingle. The first bite is a harmonious explosion of creamy richness, subtle spice, and that unmistakable buttery tang that only fresh butter can bring. I dare you to taste this and not go back for seconds, because once you experience the depth of flavor, the ordinary will pale in comparison.
What makes this version stand out isn’t just the combination of ingredients—it’s the method that turns a simple side dish into a showstopper. I’ve spent countless evenings experimenting with ratios, heat settings, and finishing touches until I discovered a technique that locks in moisture while creating a caramelized top that looks almost impossible to resist. It’s a recipe that’s hands down the best version you’ll ever make at home, and I’m thrilled to share every detail. If you’ve ever struggled with soggy scalloped potatoes or unevenly cooked layers, you’re not alone—and I’ve got the fix.
The secret lies in a few clever twists: a touch of nutmeg that adds warmth, a splash of heavy cream that thickens the sauce without overpowering, and a final sprinkle of breadcrumbs that delivers a satisfying crunch. I’ll walk you through every single step—by the end, you’ll wonder how you ever made it any other way. Get ready to transform an ordinary dinner side into an unforgettable culinary masterpiece.
What Makes This Version Stand Out
- Taste: The blend of sharp cheddar and nutty parmesan creates a layered flavor profile that lingers on the palate, turning a simple dish into a savory symphony.
- Texture: The potatoes are thinly sliced to achieve a delicate, almost translucent layer, while the breadcrumb topping offers a satisfying crunch that contrasts with the creamy interior.
- Simplicity: Despite its complex flavor, the recipe requires only a handful of pantry staples and a single baking dish, making it a go-to for busy weeknights.
- Uniqueness: The addition of a subtle nutmeg infusion and a final caramelized breadcrumb crust sets this version apart from every other scalloped potato recipe you’ve tried.
- Crowd Reaction: Friends who taste this dish often ask for the recipe the moment they finish, proving its crowd‑pleasing potential.
- Ingredient Quality: Using fresh, high‑quality butter and a mix of sharp cheddar and parmesan elevates the dish from good to gourmet.
- Cooking Method: The gentle simmer of the sauce and the controlled oven bake ensure even cooking and prevent the dreaded soggy bottom.
- Make‑ahead Potential: This dish can be assembled a day ahead and baked fresh, making it an excellent option for dinner parties or family gatherings.
Inside the Ingredient List
The Flavor Base
At the heart of this dish is a sauce that marries butter, garlic, and a splash of heavy cream. The butter forms a velvety base that carries the garlic’s aromatic punch, while the cream thickens the sauce to a luxurious consistency. If you skip the cream, the sauce will be thinner and lack the silky mouthfeel that makes each bite memorable. For a lighter version, replace half the cream with whole milk, but keep the butter to preserve richness.
The Texture Crew
Thinly sliced potatoes are the star of the show, providing a tender foundation that absorbs the savory sauce. Use Yukon Gold or russet potatoes for their natural starch content, which helps the sauce set into a firm yet creamy layer. If you prefer a firmer bite, opt for waxy potatoes like red or fingerling. Always parboil the slices for 2–3 minutes before layering to reduce cooking time and prevent sogginess.
The Unexpected Star
Nutmeg is the quiet hero that brings warmth and depth to the dish. A pinch of freshly grated nutmeg balances the richness of the cheese and cream, adding a subtle earthy note that lingers. If you’re not a fan of nutmeg, a dash of ground cinnamon or a pinch of allspice can offer a comparable depth of flavor. The key is to use it sparingly; too much can overwhelm the delicate balance.
The Final Flourish
Breadcrumbs topped with a sprinkle of parmesan add a golden, crunchy finish that contrasts beautifully with the creamy interior. For a gluten‑free option, use almond flour breadcrumbs or a mixture of crushed crackers. The breadcrumbs should be lightly toasted in a skillet with a touch of butter before adding to the dish, ensuring they stay crisp during baking.
Everything's prepped? Good. Let's get into the real action—layering the flavors, watching them mingle, and watching the oven do its magic.
The Method — Step by Step
- Preheat your oven to 375°F (190°C). While the oven warms, wash and peel the potatoes, then slice them thinly—about 1/8 inch thick. If you’re using a mandoline, set it to a thin setting to achieve uniform slices that cook evenly. This step is crucial for a silky texture that doesn’t turn mushy.
- In a medium saucepan, melt the butter over medium heat. Add the minced garlic and sauté until fragrant, about 30 seconds—just until the garlic releases its aroma without browning. The garlic’s aroma should fill the kitchen, promising a depth of flavor that’s hard to resist.
- Stir in the flour and cook for a minute, creating a roux that will thicken the sauce. Keep the mixture moving to prevent lumps; you want a smooth base that will coat the potatoes beautifully. This is the moment of truth—if the roux is uneven, the sauce will be gritty.
- Gradually whisk in the milk and heavy cream, ensuring the mixture stays smooth. Bring it to a gentle simmer, letting it thicken into a silky sauce. Add the pinch of nutmeg, salt, and pepper, stirring until the spices are fully incorporated. The sauce should have a glossy sheen and a comforting aroma.
- Arrange half of the sliced potatoes in a greased 9x13 inch baking dish, overlapping slightly to create a seamless layer. Pour half of the sauce over the potatoes, making sure each slice is coated. Sprinkle a third of the shredded cheddar and a third of the parmesan over the top. This layering creates a gradient of flavors that will melt together beautifully.
- Repeat the layering process with the remaining potatoes, sauce, and cheeses. The top layer should be a generous amount of cheese to achieve that golden, bubbly finish. If you’re a cheese lover, feel free to add a bit more cheddar for extra gooeyness.
- In a small bowl, combine the breadcrumbs with a tablespoon of melted butter and a sprinkle of parmesan. Toss until the crumbs are coated and lightly toasted. Sprinkle the breadcrumb mixture evenly over the cheese layer, creating a crisp, golden crust that will caramelize in the oven.
- Cover the dish with foil and bake for 30 minutes. The foil traps steam, allowing the potatoes to soften without drying out. After 30 minutes, remove the foil to expose the top layer to direct heat, baking for an additional 10–15 minutes until the crust is golden brown and bubbly.
- Let the scalloped potatoes rest for 5 minutes before serving. This short rest allows the sauce to set, making it easier to slice and serve without the cheese spilling everywhere. The rest also lets the flavors meld together, creating a cohesive taste experience.
- Garnish with fresh parsley or a drizzle of truffle oil for an elevated finish. Serve hot, accompanied by a crisp green salad or roasted vegetables for a balanced meal. Enjoy the harmony of creamy, cheesy layers with a crisp, buttery crust.
That's it—you did it. But hold on, I've got a few more tricks that'll take this to another level. These insider tips will help you avoid common pitfalls and elevate the dish to restaurant‑quality.
Insider Tricks for Flawless Results
The Temperature Rule Nobody Follows
Many home cooks bake scalloped potatoes at too high a temperature, causing the top to brown too quickly while the interior remains undercooked. I recommend baking at 375°F (190°C) and covering with foil for the first 30 minutes. This gentle heat allows the sauce to set and the potatoes to soften without scorching the cheese. Remember to remove the foil for the final 10–15 minutes to achieve that coveted golden crust.
Why Your Nose Knows Best
The aroma of butter melting with garlic is an early indicator that your sauce is developing the right flavor profile. If the smell is too sharp or metallic, it may mean the butter has burned. Keep the heat medium and stir constantly to prevent scorching. A pleasant, buttery scent should fill the kitchen, signaling that everything is on track.
The 5‑Minute Rest That Changes Everything
After removing the dish from the oven, let it rest for exactly five minutes. This brief pause allows the sauce to thicken further, making it easier to slice without cheese spilling everywhere. A quick rest also lets the flavors settle, creating a more harmonious taste experience. Skip this step and you’ll end up with a messy, uneven bite.
Layering Like a Pro
When arranging the potatoes, always start with a thin layer of sauce before adding the first slice. This technique ensures each potato gets coated evenly, preventing dry spots. A good rule of thumb is to cover the bottom of the dish with a light sauce layer, then layer potatoes and sauce in alternating layers.
Breadcrumbs for Crunch
To avoid soggy breadcrumbs, toss them in a little melted butter before sprinkling on top. The butter creates a barrier that keeps the crumbs crisp during baking. If you’re gluten‑free, consider using almond flour crumbs or crushed crackers for a similar effect.
Add a Splash of Water When Reheating
If you’re reheating leftovers, add a splash of water or milk to the dish before covering and microwaving. This moisture prevents the dish from drying out and helps restore its creamy texture. The water also creates steam, which helps re‑melt the cheese evenly.
Creative Twists and Variations
This recipe is a playground. Here are some of my favorite ways to switch things up:
Mushroom Medley Edition
Sauté sliced mushrooms with garlic and thyme, then layer them between the potato slices for an earthy depth. The mushrooms add a meaty texture that pairs wonderfully with the creamy sauce. Serve with a side of roasted asparagus for a complete, hearty meal.
Cheesy Broccoli Surprise
Steam broccoli florets until just tender and fold them into the sauce before layering. The broccoli adds color, crunch, and a subtle vegetal note that balances the richness. This variation is perfect for those who want a veggie boost without sacrificing flavor.
Herb‑Infused Delight
Add chopped rosemary and thyme to the sauce for a fragrant, aromatic twist. The herbs infuse the potatoes with a Mediterranean feel, making the dish ideal for a spring or summer gathering. Garnish with fresh basil for an extra pop of color.
Spicy Sriracha Kick
Stir a teaspoon of sriracha into the sauce for a subtle heat that pairs with the creamy cheese. The spice adds a layer of excitement and makes the dish a crowd‑pleaser at potlucks. Balance the heat with a dollop of sour cream on top.
Truffle Oil Finale
Drizzle a few drops of truffle oil over the finished dish for an indulgent, earthy aroma. Truffle oil elevates the scalloped potatoes into a gourmet experience, perfect for special occasions. Pair it with a glass of crisp white wine for a decadent dinner.
Storing and Bringing It Back to Life
Fridge Storage
Cool the dish completely, then cover tightly with plastic wrap or a lid. Store in the refrigerator for up to 3 days. The layers will hold their structure, but the sauce may thicken slightly. When ready to serve, reheat gently in the oven at 325°F (165°C) for about 15 minutes.
Freezer Friendly
Wrap the dish tightly in foil, then place in a freezer bag. Freeze for up to 2 months. To thaw, let it sit in the refrigerator overnight. Reheat in the oven at 350°F (175°C) until hot, about 25 minutes, adding a splash of milk to restore creaminess.
Best Reheating Method
Reheat in the oven to preserve the crisp crust. Place the dish on a baking sheet and cover loosely with foil to prevent over‑browning. Add a splash of water or milk before reheating to keep the sauce moist. The dish will taste almost as fresh as when first baked.