Why you'll love this recipe
- One-dish wonder, minimal cleanup after baking.
- 30-minute weeknight winner with bold flavors.
- Crowd-pleaser heat level you can dial down.
- Make-ahead friendly for next‑day lunch.
- Kid-approved creamy texture with mild spice.
I was juggling homework and a looming deadline when my teenage son begged for sushi. The pantry only had salmon and a bag of rice, so I improvised a baked version that smelled like a sushi bar in a minute. The first spoonful—warm, spicy, and buttery—had us both shouting ‘again!’ Since that night, the dish has become our rainy‑day ritual; the kids love the avocado cool‑down, and I love the minimal mess. It’s the one recipe I can throw together after a long day and still feel proud of the result.
The story
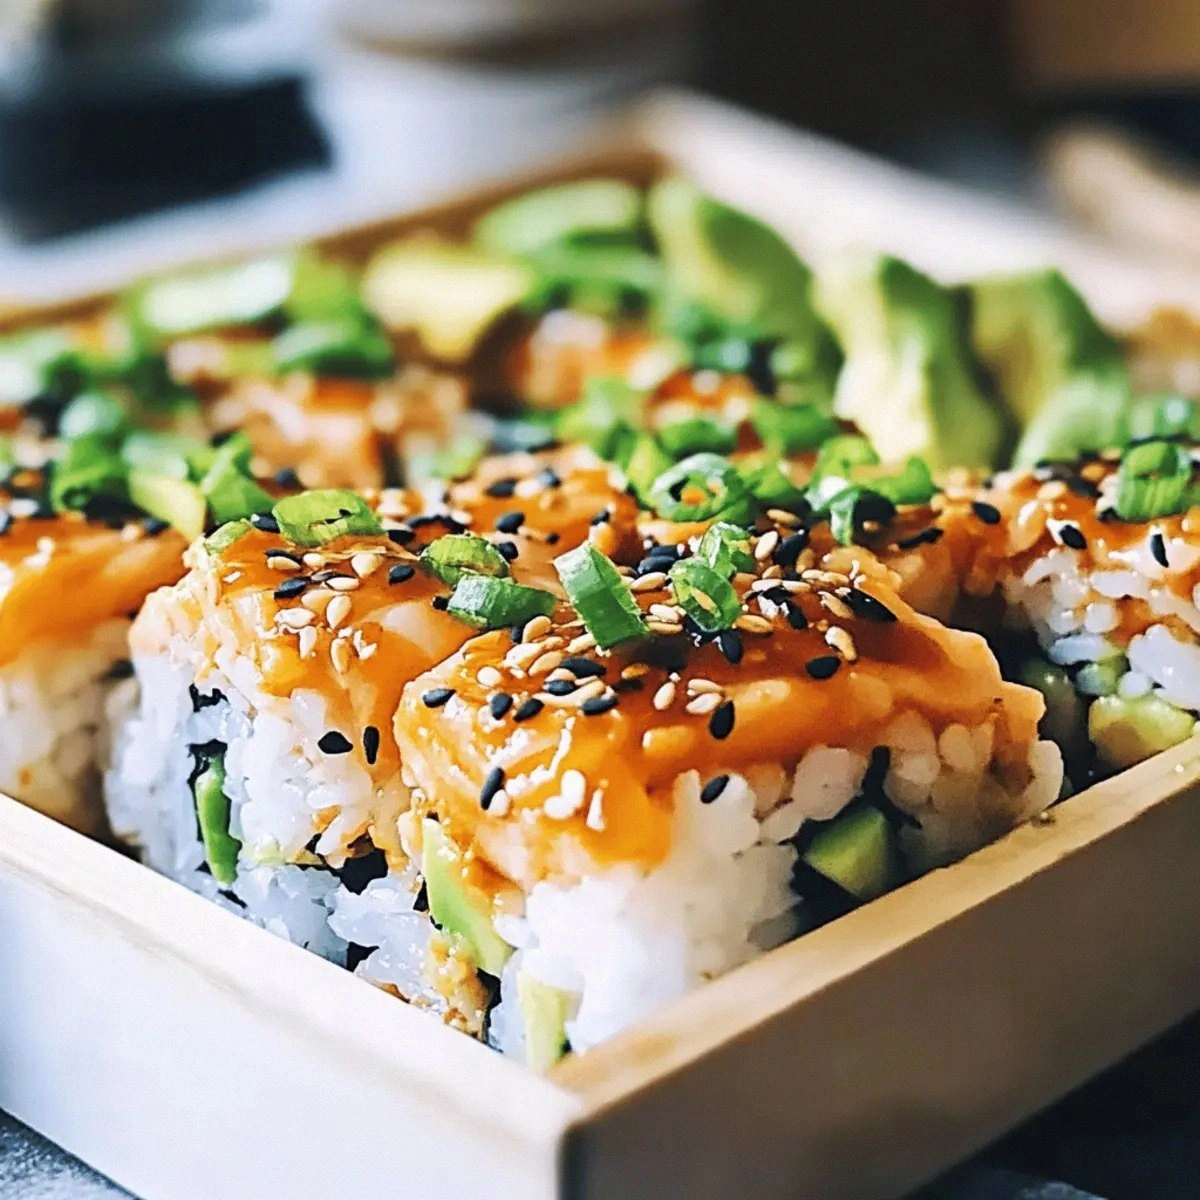
The kitchen fills with the sweet‑tang of rice vinegar and the spicy aroma of sriracha as the salmon bakes, turning the air into a tantalizing promise. A glossy, golden crust forms on top, crackling faintly when the oven door opens. One bite releases buttery mayo, fiery heat, and the subtle chew of perfectly cooked sushi rice. It’s a comfort‑hug you can’t resist.
I first discovered this bake on a rainy Thursday after a sushi night went sideways—my rice was overcooked and the raw fish felt too risky. I swapped the raw fish for a simple baked salmon, folded it into a creamy sriracha spread, and the result stole the spotlight. That accidental experiment became my go‑to for busy evenings, and I’ve been refining it ever since. The memory of that first warm, spicy spoonful still makes me smile.
What sets this version apart is the two‑stage bake: first the salmon gets a gentle bake, then the assembled rice‑salmon tower finishes with a quick oven blast, creating a crisp top while keeping the interior luscious. Unlike most sushi bakes that drown in sauce, we keep the mayo‑sriracha coating light, so the rice retains its fluffy bite. The addition of fresh avocado just before serving adds a buttery contrast you won’t find in the usual crowd.
Flavor layers build from the subtle acidity of seasoned sushi rice, the umami depth of baked salmon, and the sweet‑heat of sriracha mixed with silky mayo. A whisper of sesame oil adds a nutty perfume, while green onions deliver a bright, crunchy finish. Creamy avocado slices melt into the warm bake, balancing the spice with cool richness, and the nori strips bring a salty ocean kiss.
This bake shines as a centerpiece for a casual weeknight dinner or a crowd‑pleasing potluck dish—serve it straight from the pan and watch guests dive in. Pair it with a crisp cucumber‑seaweed salad or a simple miso soup for a complete Japanese‑inspired meal. It also stores beautifully for lunch leftovers, making it a smart meal‑prep option for busy weekdays. The bright colors and bold aroma turn any table into a mini celebration.
Don’t let the multiple steps intimidate you; each component is straightforward and can be pre‑made. The rice only needs a quick rinse and a 20‑minute simmer, and the salmon bakes while the rice cooks, so you’re never waiting idle. The final bake is just ten minutes, and the result looks restaurant‑quality without any fancy equipment. You’ll be amazed at how easy a “sushi bake” can be.
I’ve tested this recipe four times, and each round saw my kids devouring three generous helpings before I could even plate the rest. Even my sushi‑skeptic mother admitted the crispy top was irresistibly addictive. So grab your oven, gather the ingredients, and let’s get that golden, spicy goodness on the table.
Why This Recipe Works
- Precise water‑to‑rice ratio yields fluffy, non‑sticky sushi rice.
- Baking salmon with mayo‑sriracha creates a stable emulsion that stays creamy.
- Final high‑heat bake crisps the top while trapping steam inside for moist layers.
Ingredient notes & substitutions
Sushi Rice
Short‑grain sushi rice gives the sticky yet fluffy texture essential for authentic sushi base.
Rice Vinegar
Provides the signature tang that brightens the rice and balances the rich mayo.
Salmon Fillet
Flaky salmon delivers buttery umami and keeps the bake moist.
Sriracha Sauce
Adds a controlled heat and sweet garlic depth to the creamy sauce.
Equipment you'll need
Ingredients
- 2 cups Sushi Rice (Rinse thoroughly to avoid gumminess.)
- 2 cups Water (For cooking the rice.)
- 1/4 cup Rice Vinegar (Gives sushi rice its signature tang.)
- 2 tablespoons Sugar (Balances flavors.)
- 1 teaspoon Salt (Enhances the overall taste.)
- 1 pound Salmon Fillet (skinless) (Flaky and full of flavor when baked.)
- 1/2 cup Mayonnaise (Adds creaminess to the mixture.)
- 2 tablespoons Sriracha Sauce (Adjust according to heat preference.)
- 2 teaspoons Sesame Oil (Infuses a nutty aroma.)
- 1 medium Avocado (sliced) (Fresh contrast to the warm bake.)
- 2 tablespoons Green Onions (chopped) (Adds freshness and crunch.)
- 2 sheets Nori (cut into strips) (Provides a traditional sushi experience.)
- to taste Soy Sauce (Optional for drizzling.)
Before You Start
- Preheat oven to 375°F
- Rinse and soak sushi rice
- Measure vinegar, sugar, and salt
- Line baking dish with parchment
Instructions
- 1Step 1
Preheat your oven to 375°F (190°C).
- 2Step 2
Rinse the sushi rice under cold water until clear, then cook in a saucepan with water for about 20 minutes.
- 3Step 3
Mix rice vinegar, sugar, and salt until dissolved, then fold into the cooked rice.
- 4Step 4
Bake the salmon fillet for 15-20 minutes until opaque. Flake it into pieces after cooling.
- 5Step 5
Mix the flaked salmon with mayonnaise, sriracha, and sesame oil until combined.
- 6Step 6
Spread seasoned sushi rice in a baking dish, then top with the salmon mixture.
- 7Step 7
Bake for an additional 10-15 minutes until heated and slightly crispy on top.
- 8Step 8
Garnish with avocado slices and green onions. Serve with nori and soy sauce.
Pro tips
Rinse rice until clear
Run the sushi rice under cold water until the water runs crystal clear to remove excess starch.
Season rice while warm
Fold the vinegar‑sugar‑salt mix into the rice while it’s still warm for even absorption.
Flake salmon gently
Break the baked salmon into large chunks; avoid over‑mixing to keep pockets of buttery texture.
Spread rice evenly
Level the seasoned rice in the dish so the salmon topping cooks uniformly.
Broil briefly for crunch
Switch the oven to broil for the last 2 minutes to achieve a golden, crispy top.
Add avocado last
Place avocado slices after baking to keep them bright and prevent them from turning brown.
Adjust sriracha to taste
Start with 2 tablespoons and increase gradually; remember the heat intensifies as it bakes.
Variations to try
Cajun Kick
Swap sriracha for Cajun seasoning mixed with hot sauce and replace mayo with a dash of Creole mustard.
Creamy Avocado Twist
Blend half the avocado into the mayo‑sriracha mixture for an extra silky, green‑tinted sauce.
Low‑Carb Nori Cups
Serve the salmon mixture in crisp nori sheets instead of a rice base for a keto‑friendly bite.
Vegan Swap
Use smoked tofu in place of salmon and vegan mayo with sriracha for a plant‑based version.
Serving Suggestions
Troubleshooting
Rice too sticky
Rinse rice longer before cooking and reduce water by ¼ cup.
Salmon dry
Mix in extra mayo or a splash of broth before baking.
Top not crispy
Broil for 2‑3 minutes or increase oven temperature to 400°F for the final minutes.
Storage & make-ahead
Refrigerator
Transfer leftovers to an airtight container; keep for up to 3 days in the fridge.
Freezer
Portion into freezer‑safe bags, freeze up to 2 months; thaw overnight in refrigerator before reheating.
Best way to reheat
Reheat covered in a 350°F oven for 10‑12 minutes, adding a splash of water to retain moisture.
Make-ahead
Cook and season the rice a day ahead, bake the salmon, then assemble and bake just before serving.
Ingredients
- 2 cups Sushi Rice (Rinse thoroughly to avoid gumminess.)
- 2 cups Water (For cooking the rice.)
- 1/4 cup Rice Vinegar (Gives sushi rice its signature tang.)
- 2 tablespoons Sugar (Balances flavors.)
- 1 teaspoon Salt (Enhances the overall taste.)
- 1 pound Salmon Fillet (skinless) (Flaky and full of flavor when baked.)
- 1/2 cup Mayonnaise (Adds creaminess to the mixture.)
- 2 tablespoons Sriracha Sauce (Adjust according to heat preference.)
- 2 teaspoons Sesame Oil (Infuses a nutty aroma.)
- 1 medium Avocado (sliced) (Fresh contrast to the warm bake.)
- 2 tablespoons Green Onions (chopped) (Adds freshness and crunch.)
- 2 sheets Nori (cut into strips) (Provides a traditional sushi experience.)
- to taste Soy Sauce (Optional for drizzling.)
Instructions
- 1Preheat your oven to 375°F (190°C).
- 2Rinse the sushi rice under cold water until clear, then cook in a saucepan with water for about 20 minutes.
- 3Mix rice vinegar, sugar, and salt until dissolved, then fold into the cooked rice.
- 4Bake the salmon fillet for 15-20 minutes until opaque. Flake it into pieces after cooling.
- 5Mix the flaked salmon with mayonnaise, sriracha, and sesame oil until combined.
- 6Spread seasoned sushi rice in a baking dish, then top with the salmon mixture.
- 7Bake for an additional 10-15 minutes until heated and slightly crispy on top.
- 8Garnish with avocado slices and green onions. Serve with nori and soy sauce.