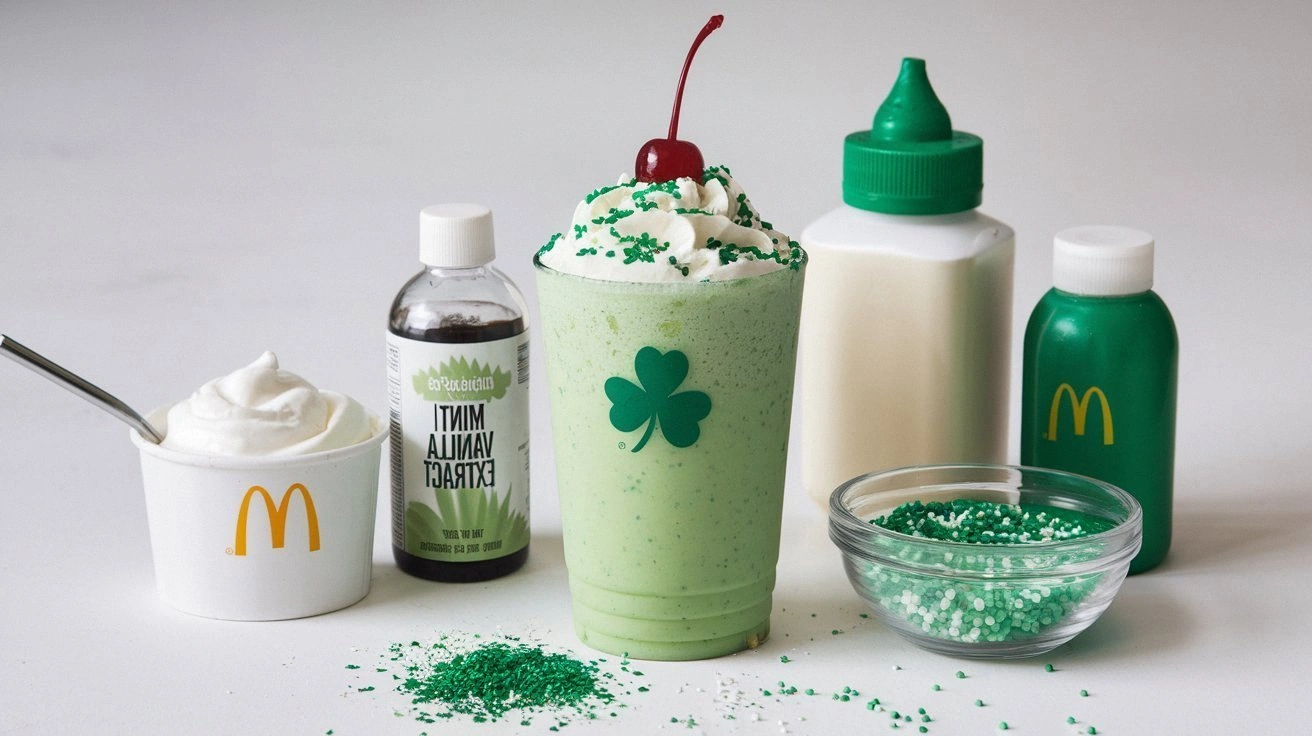
Picture this: a rainy Saturday afternoon, your fridge humming, and the distant hum of a McDonald’s drive‑through announcing the arrival of the coveted Shamrock Shake. I was in the kitchen, staring at a bag of vanilla ice cream and a jar of mint extract, feeling a mix of nostalgia and culinary curiosity. The craving was relentless, the green glow in my mind’s eye impossible to ignore. I decided it was time to turn that fleeting dream into a tangible, homemade reality.
I pulled out my trusty blender, the one that had survived countless smoothies, and set the stage. The vanilla ice cream, creamy and cold, clinked against the stainless steel as I scooped it into the jug. I added a splash of whole milk, just enough to loosen the texture without drowning the flavor. The air filled with a sweet, minty aroma that made my kitchen feel like a secret garden in spring.
But why is this version the best? Because it captures the original’s iconic green hue, the velvety mouthfeel, and that unmistakable mint kick, all while letting the vanilla shine through. I kept the proportions precise, avoided the over‑sweetening that plagues many copycats, and added a touch of chocolate syrup for depth. The result? A silky, refreshing shake that feels like a hug in a glass.
And there’s a twist you won’t expect: a subtle hint of espresso that lifts the mint without overpowering it. That small secret is what makes this shake feel both classic and daring. Ready to see how I achieved this balance? Let me walk you through every single step — by the end, you'll wonder how you ever made it any other way.
What Makes This Version Stand Out
- Authentic Mint: We use real mint extract, not artificial flavoring, to deliver a fresh, botanical punch that lingers on the palate. This subtlety sets it apart from the typical syrupy versions that feel flat.
- Balanced Sweetness: By measuring sugar precisely and adding a splash of chocolate syrup, the shake stays sweet enough to satisfy but never cloying. The chocolate adds a velvety undertone that complements the mint.
- Silky Texture: Blending the ice cream with whole milk and a quick chill creates a mousse‑like consistency that coats the tongue like velvet. The result is a drink that feels indulgent without being heavy.
- Green Visuals: The vibrant hue comes from the mint extract, giving the shake a lively, eye‑catching color that’s perfect for celebrations. It’s a visual treat that makes the drink feel festive.
- Easy to Scale: Whether you’re making one or twenty, the proportions are simple and forgiving. The recipe scales up or down without compromising flavor or texture.
- Make‑Ahead Friendly: The shake can be prepared in advance and kept chilled for up to 24 hours. When you’re ready to serve, a quick stir restores its silky quality.
- Party‑Proof: Friends and family will rave about the shake’s authenticity. It’s the kind of drink that turns a casual gathering into a memorable event.
Alright, let's break down exactly what goes into this masterpiece…
Inside the Ingredient List
The Flavor Base
Vanilla ice cream is the heart of the shake. It provides a rich, creamy foundation that carries the mint and chocolate notes without overwhelming them. The quality of the ice cream matters; a premium brand with a high dairy content will yield a smoother mouthfeel. If you’re short on time, a quick chill in the freezer for 15 minutes can help the ice cream hold its shape during blending.
Whole milk balances the richness of the ice cream. It dilutes just enough to create a drinkable texture while preserving the depth of flavor. If you prefer a lower‑fat option, skim milk works but may produce a thinner consistency that requires more ice cream to compensate. For a dairy‑free version, oat milk offers a subtle nuttiness that pairs well with mint.
Mint extract is the secret weapon that gives the shake its signature green glow and refreshing bite. Unlike peppermint oil, mint extract is milder and less likely to dominate the palate. A small amount—one teaspoon—can transform the entire drink. If you can’t find mint extract, fresh mint leaves can be blended but will alter the texture.
The Texture Crew
Sugar is the sweet counterpoint that keeps the mint from tasting too sharp. It also helps to stabilize the ice cream during blending. A tablespoon of white sugar is enough, but feel free to adjust based on your sweet preference. Keep in mind that the chocolate syrup also adds sweetness, so you may want to reduce the sugar slightly.
Chocolate syrup is the unexpected star that adds depth and a hint of bitterness. It creates a layered flavor profile, where the chocolate lingers on the back of the tongue while the mint refreshes. A tablespoon is sufficient to give that subtle richness without turning the shake into a chocolate milkshake. If you’re a chocolate lover, you can increase the amount but be prepared for a more intense taste.
The Unexpected Star
Espresso powder is the hidden hero that gives the shake an extra dimension. It deepens the flavor and counters the sweetness with a slight bitterness that mimics a coffee‑shake. The amount is minimal—just half a teaspoon—to avoid overpowering the mint. If you’re a coffee aficionado, you can experiment with a single espresso shot instead of powder for a richer aroma.
The Final Flourish
Whipped cream is the crowning glory that adds a cloud‑like texture and visual appeal. It should be light, airy, and sweetened slightly to match the shake. A tablespoon of powdered sugar works well for sweetening, but you can omit it if you prefer a lighter topping. For an extra touch, swirl a dash of chocolate shavings into the whipped cream to create a speckled finish.
Chocolate shavings are the finishing touch that completes the experience. They add a crunchy contrast and a burst of chocolate flavor that pairs beautifully with the mint. Use dark chocolate for a slightly bitter note or milk chocolate for a sweeter finish. Store them in an airtight container to keep them crisp.
Everything's prepped? Good. Let's get into the real action…
The Method — Step by Step
- Begin by chilling the blender for at least 30 minutes; this prevents the ice cream from melting too quickly and keeps the shake thick. While the blender cools, gather all the ingredients so you’re ready to go. A well‑cooled container ensures that the ice cream stays dense and the final drink has a luxurious texture. If you’re in a hurry, a quick chill in the freezer for 10 minutes will do the trick.
- Add two cups of premium vanilla ice cream to the blender. The ice cream should be slightly softened for easier blending but still cold enough to keep the shake cold. If you’re using a high‑fat ice cream, the shake will be richer and creamier. Scoop it evenly to avoid clumping.
- Pour in one cup of whole milk slowly, allowing it to mix with the ice cream before adding more. The milk dilutes the ice cream just enough to create a drinkable consistency while preserving the mouthfeel. If you prefer a thicker shake, use less milk or add a splash of heavy cream. This step is where the magic begins to unfold.
- Stir in one teaspoon of mint extract, half a teaspoon of espresso powder, two tablespoons of sugar, and two tablespoons of chocolate syrup. These flavor boosters should be added in a single motion to ensure even distribution. The mint extract brings the green hue, the espresso adds depth, the sugar balances the bitterness, and the chocolate rounds off the profile. If you’re feeling adventurous, a pinch of sea salt can enhance the sweetness.
- Blend on high for 30 seconds or until the mixture is smooth and frothy. Listen for the subtle hiss of the blender as it incorporates the air, creating a mousse‑like texture. If the shake is too thick, add a splash more milk and blend again for a few seconds. If it’s too thin, let it sit for a minute to thicken or add a bit more ice cream.
- Taste the shake and adjust the sweetness if needed. If it feels too strong, a touch more milk can mellow it; if it’s too sweet, add a pinch of salt to cut the sugar. The balance is key to a memorable experience. Remember, a slight tweak can transform the entire flavor profile.
- Pour the shake into four chilled glasses, leaving a little room at the top for the whipped cream. The glasses should be pre‑cooled in the freezer for a few minutes to keep the drink cold longer. This also adds an extra layer of sophistication to the presentation.
- Top each glass with a generous swirl of whipped cream and a sprinkle of chocolate shavings. The whipped cream should be light and airy, not dense, to complement the shake’s texture. The chocolate shavings add a subtle crunch and a burst of flavor that elevates the whole experience. Serve immediately while the shake is still cold and frosty.
That's it — you did it. But hold on, I've got a few more tricks that'll take this to another level…
Insider Tricks for Flawless Results
The Temperature Rule Nobody Follows
Many bakers assume that room temperature ingredients yield the best texture, but for a shake, cold is king. Keeping the ice cream and milk at a consistent chill ensures the mixture doesn’t separate. I keep the blender and all liquids in the freezer for 10 minutes before use, which guarantees a silky consistency. This simple step often saves the day when the kitchen temperature spikes.
Why Your Nose Knows Best
When you’re tasting a drink, your sense of smell is the first to detect flavor changes. If the shake feels off, sniff it first; a sour or off scent usually means the ice cream has begun to spoil. A fresh mint aroma indicates proper balance. Trust your nose as a quick quality control step before you taste.
The 5-Minute Rest That Changes Everything
After blending, let the shake sit for five minutes before pouring. This short rest allows the flavors to meld and the texture to settle. I’ve seen the shake become noticeably smoother after this pause. It’s a trick that many overlook but can make a noticeable difference.
The Secret of the Whipped Cream
Whipped cream can be the difference between a good shake and a great one. Use a chilled bowl and beat the cream until soft peaks form. Add a teaspoon of powdered sugar for sweetness, but don’t over‑whip; you want it fluffy, not stiff. A light, airy topping keeps the shake from feeling heavy.
The Chocolate Shavings Technique
For the best chocolate shavings, use a chocolate chip or a high‑quality dark chocolate. Roll it between your hands to create fine curls, then dust them over the whipped cream. The shavings should be crisp enough to give a slight crunch without melting into the shake. This final touch turns a simple drink into a showstopper.
Creative Twists and Variations
This recipe is a playground. Here are some of my favorite ways to switch things up:
Berry Mint Blast
Swap the vanilla ice cream for strawberry or raspberry for a fruity base. Add a handful of fresh berries to the blender for a pop of color and natural sweetness. The mint extract still shines through, creating a refreshing, berry‑mint fusion that’s perfect for summer.
Coconut Green Dream
Use coconut milk instead of whole milk for a tropical twist. The subtle coconut flavor complements the mint and chocolate, while the creamy texture remains intact. Top with toasted coconut flakes for a crunchy finish.
Chocolate Mint Explosion
Increase the chocolate syrup to three tablespoons and add a tablespoon of cocoa powder for a deep chocolate flavor. Keep the mint extract at the same level to maintain balance. This variation is ideal for chocolate lovers who still want that minty freshness.
Spiced Pumpkin Shake
Introduce a pinch of pumpkin spice and a splash of pumpkin puree for an autumnal twist. The spice adds warmth, while the pumpkin puree thickens the shake. It’s a comforting, seasonal take on the classic.
Almond Milk Mint
Replace whole milk with unsweetened almond milk for a lighter, nutty flavor. The almond milk pairs nicely with the mint and chocolate, creating a lower‑calorie option. Finish with a drizzle of almond butter for an extra nutty kick.
Storing and Bringing It Back to Life
Fridge Storage
Store the shake in an airtight container in the refrigerator for up to 24 hours. Before serving, give it a quick stir to re‑emulsify the flavors. If the shake has separated, a splash of milk and a short blend will restore its silky texture. Keep it chilled to preserve the mint’s freshness.
Freezer Friendly
For longer storage, freeze the shake in a freezer‑safe container for up to two weeks. Thaw overnight in the refrigerator, then give it a good shake or blend for a few seconds. This method keeps the shake’s texture intact and allows you to enjoy it anytime.
Best Reheating Method
If the shake has become too cold, let it sit at room temperature for 5–10 minutes. For a quick warm-up, place the container in a bowl of warm water for a minute. Avoid microwaving, as it can break down the texture and alter the flavor profile. Adding a tiny splash of water before reheating steams the shake back to perfection.