I was standing in my kitchen, staring at a pile of unopened oysters, when my friend dared me to whip up something that would make the whole house smell like a seaside festival. The challenge felt absurd, like trying to turn a clunky old blender into a high‑speed smoothie machine. I had never cooked oysters before, but the idea of turning them into a creamy, baked masterpiece had a magnetic pull. That moment, the kitchen lights flickering, the scent of brine already starting to mingle with the air, was the spark that lit this recipe. I knew I had to make it unforgettable.
The first time I cracked an oyster open, the sound was a wet, satisfying pop that echoed through the quiet kitchen. The shell crackled like a tiny, salty drumbeat, and a burst of briny aroma flooded the room, instantly transporting me to a coastal pier on a summer afternoon. I could almost taste the sea spray on my tongue even before the first bite. That sensory overload was a reminder that oysters are more than just shellfish—they’re a portal to the ocean. I was ready to turn that portal into a dish that would make my friends swoon.
What makes this version stand out is the marriage of a silky Japanese mayo base with a sharp Parmesan finish, creating a sauce that coats each oyster like velvet. The lemon juice adds a citrusy zing that cuts through the richness, while the subtle sweetness of sugar balances the brine. The result is a creamy, slightly tangy, and utterly addictive flavor profile that will have you reaching for seconds. I dare you to taste this and not go back for a second serving. It’s hands down the best version you’ll ever make at home.
I’ve spent countless hours tinkering with oyster recipes, and most of them either come out too dry or too soggy. The trick here is to bake them just long enough to allow the sauce to caramelize without losing the delicate texture of the shell. I’ve discovered that a quick, high‑heat finish does the job, turning the edges into a golden crisp that shatters like thin ice. That contrast between the buttery interior and the crunchy exterior is pure magic. Picture yourself pulling this out of the oven, the whole kitchen smelling incredible, and knowing you’ve just created something extraordinary.
The secret sauce is deceptively simple, yet it’s the star of the show. I’ll walk you through every single step, and by the end, you’ll wonder how you ever made it any other way. The method is straightforward, the ingredients are pantry‑friendly, and the results are a showstopper. If you’ve ever struggled with oyster dishes, you’re not alone—this recipe is the fix you’ve been waiting for. And trust me, the first bite will have you shouting, “This is amazing!”
What Makes This Version Stand Out
- Flavor: The creamy mayo base is infused with Parmesan and a hint of lemon, creating a complex, savory sauce that lingers on the palate. This isn’t just a coating; it’s a flavor punch that elevates the oysters from simple to sensational. The subtle sweetness from the sugar balances the brine, making each bite harmonious. The result is a dish that feels both luxurious and approachable.
- Texture: The oysters are baked until the sauce caramelizes into a glossy, slightly crunchy top, while the interior stays moist and tender. The contrast between the crisp edges and the buttery center is a delightful play of textures that keeps you coming back for more. The sauce’s viscosity coats the shell like velvet, making each bite feel indulgent.
- Simplicity: Only seven ingredients, most of which you probably already have, make this recipe a breeze. No elaborate marinades or complicated prep work—just a quick mix, a few oysters, and a short oven time. It’s the kind of dish that saves time yet delivers wow factor.
- Uniqueness: The fusion of Japanese mayo and Parmesan isn’t something you see often in oyster recipes. This unexpected pairing gives the dish a signature taste that sets it apart from traditional fried or grilled oysters.
- Crowd Reaction: Friends who have tried this will swear it’s the most memorable oyster dish they’ve ever had. The creamy, savory sauce paired with the briny oyster creates a flavor profile that excites both casual diners and seasoned seafood lovers alike.
- Ingredient Quality: Fresh, high‑quality oysters are essential. The better the oysters, the more pronounced the briny flavor, which balances the richness of the sauce. Choosing oysters that are firm and have a clean smell will elevate the dish.
- Cooking Method: Baking at a high temperature gives the sauce a caramelized finish while keeping the oysters juicy. This method is easier than grilling and avoids the risk of overcooking the delicate shells.
- Make‑Ahead Potential: You can assemble the dish a few hours ahead, refrigerate, and bake right before serving. The sauce actually deepens in flavor, making it a convenient option for entertaining.
Alright, let's break down exactly what goes into this masterpiece...
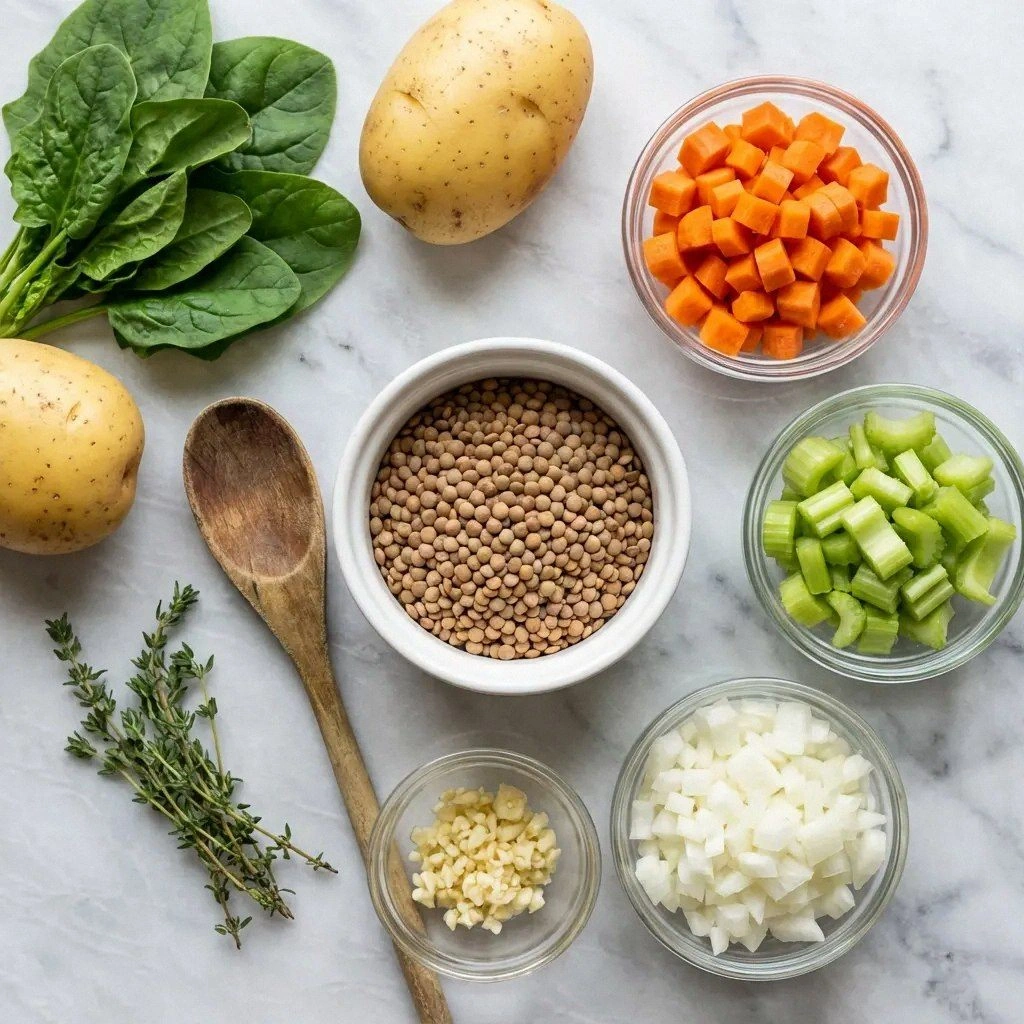
Inside the Ingredient List
The Flavor Base
Japanese mayo is the foundation of this sauce, offering a silky texture and a subtle tang that sets the stage for the other flavors. Its richness complements the briny oysters, creating a balanced bite. If you can’t find Japanese mayo, a 1:1 mix of regular mayo and a splash of rice vinegar will work, though it’ll be slightly less creamy. This base is what makes the dish feel indulgent without being overwhelming.
The Texture Crew
Parmesan cheese adds a nutty depth and a hint of umami that enhances the oyster’s natural flavor. The cheese melts into the mayo, forming a glossy, slightly crispy crust when baked. If you’re vegan, try a nutritional yeast blend for a cheesy note that still melts beautifully. The texture contrast between the melted cheese and the firm oyster shell is a key sensory highlight.
The Unexpected Star
Lemon juice brings a bright acidity that cuts through the richness of the mayo and Parmesan. It also brightens the overall flavor profile, preventing the dish from feeling too heavy. A fresh squeeze is best; bottled lemon juice can taste flat. This small splash of citrus is what turns a good dish into a great one.
The Final Flourish
Onion powder, sugar, and water are the subtle supporting players that bring harmony to the sauce. Onion powder adds a gentle, savory backdrop that enhances the oysters’ brininess. Sugar balances the acidity and helps the sauce caramelize during baking. Water adjusts the sauce’s consistency, ensuring it coats the oysters evenly without becoming too thick. Together, these ingredients create a sauce that’s both silky and flavorful.
Everything's prepped? Good. Let's get into the real action...
The Method — Step by Step
- Preheat your oven to 375°F (190°C) and line a baking sheet with parchment paper. The high heat will help the sauce caramelize while keeping the oysters moist. If you’re short on time, set the oven to “broil” for the last 2 minutes for a crisp finish. This step is crucial for that golden crust everyone loves.
- In a medium bowl, whisk together the Japanese mayo, Parmesan cheese, lemon juice, onion powder, sugar, and water until you have a smooth, glossy sauce. The consistency should be pourable but thick enough to coat the oysters without dripping. Taste the sauce; it should be slightly sweet with a bright citrus note.
- Place the oysters on the prepared baking sheet, leaving a small gap between each shell to allow the sauce to spread. If you’re using a larger batch, you may need a second sheet to avoid overcrowding. The spacing ensures even cooking and prevents the sauce from pooling.
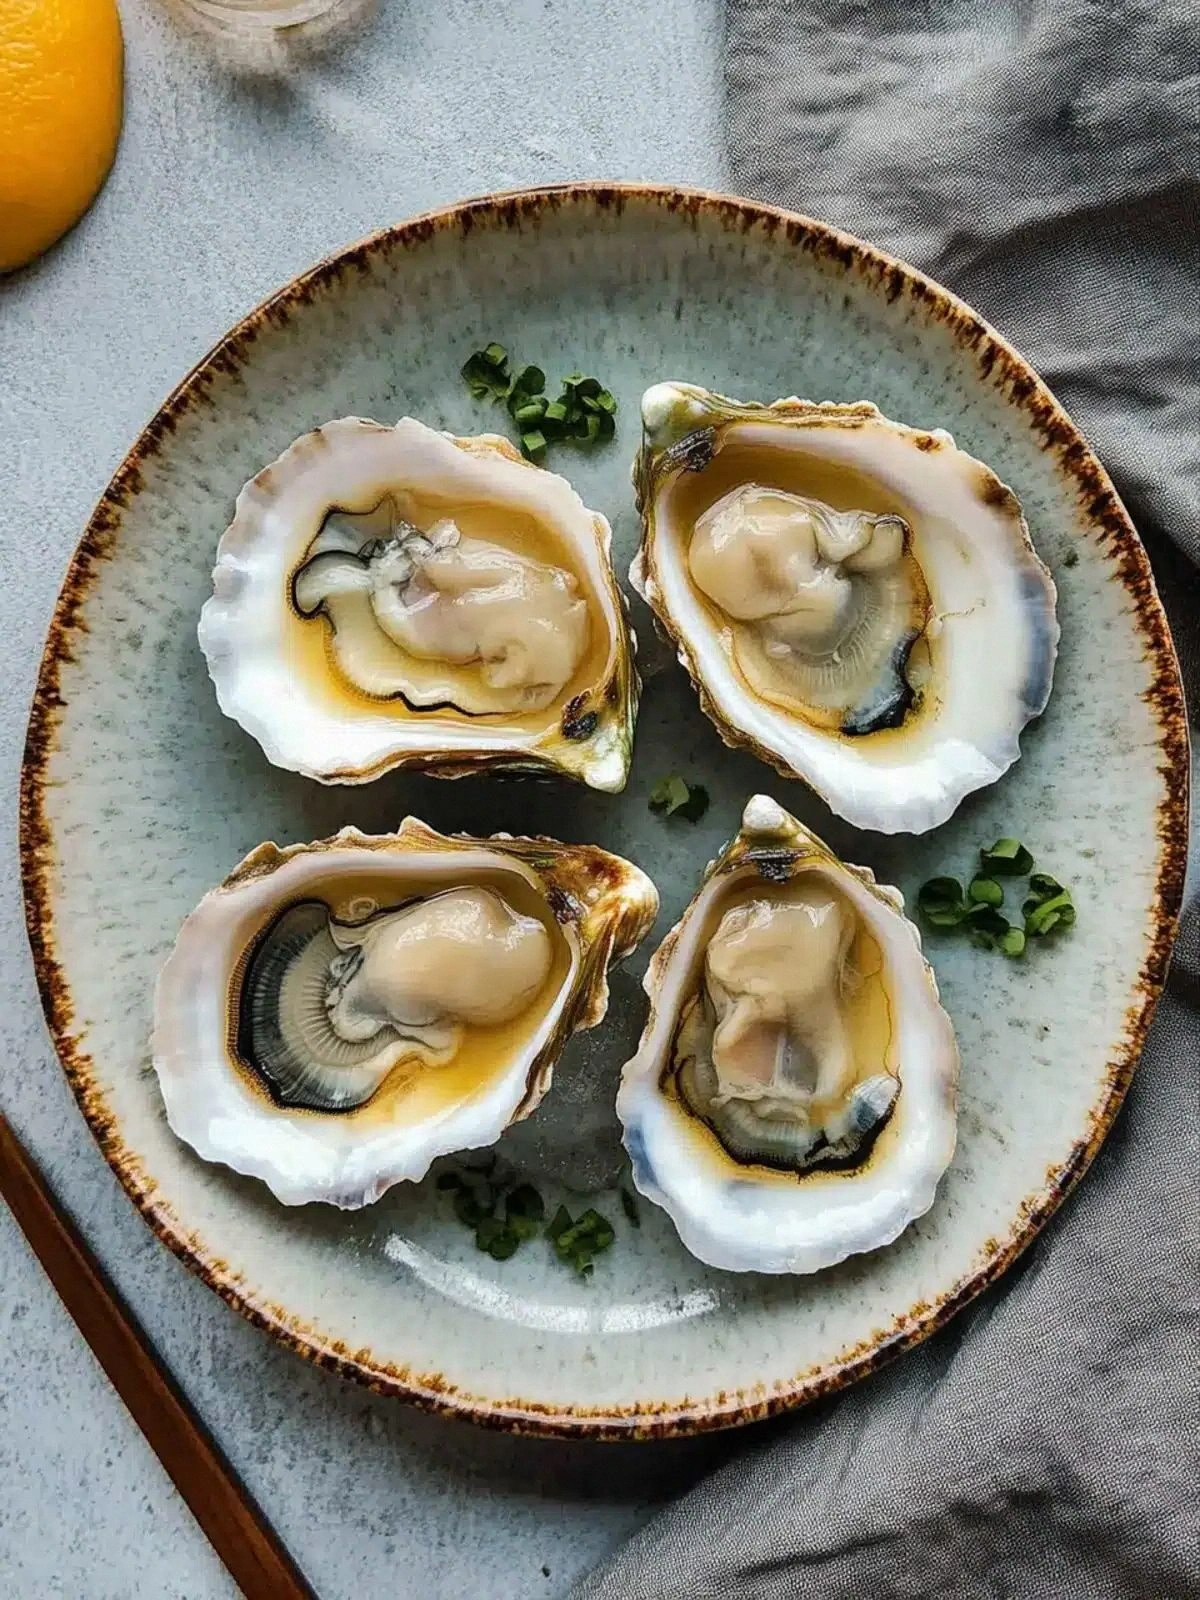
- Using a spoon or small ladle, pour the sauce evenly over each oyster, making sure the top is fully covered. The sauce should sit on top like a glossy glaze. This is where the magic happens; the sauce will caramelize into a golden crust during baking.
- Bake in the preheated oven for 18-20 minutes, or until the sauce is bubbling and the edges have turned a deep golden brown. The oysters should still be slightly pink inside, indicating they’re perfectly cooked. Keep a close eye on the color; you don’t want them to burn.
- Remove the baking sheet from the oven and let the oysters rest for 2 minutes. This short rest allows the juices to settle, making the oysters easier to handle. The sauce will thicken slightly, creating an even richer glaze.
- Transfer the oysters to a serving platter and garnish with a sprinkle of fresh parsley or a drizzle of extra lemon zest if desired. The fresh herbs add a pop of color and a burst of freshness that balances the richness. A quick squeeze of lemon over the top can enhance the citrus note even more.
- Serve immediately while the oysters are still warm and the sauce is at its peak. Pair with a chilled glass of crisp white wine or a light sparkling cider for a complete dining experience. If you’re serving at a party, consider arranging them on a decorative platter for an instant wow factor.
- If you have leftovers, store them in an airtight container in the refrigerator for up to 2 days. Reheat gently in the oven at 300°F (150°C) for 5-7 minutes, adding a splash of water to keep the sauce from drying out. The reheated oysters should still retain their creamy, caramelized edges.
That's it — you did it. But hold on, I've got a few more tricks that'll take this to another level...
Insider Tricks for Flawless Results
The Temperature Rule Nobody Follows
Many people bake oysters at 400°F, assuming higher heat equals better results. In reality, a slightly lower temperature of 375°F allows the sauce to caramelize evenly without scorching the shell. This temperature also keeps the oyster meat tender, preventing that rubbery texture that plagues overcooked seafood. I’ve baked countless batches at 375°F and consistently achieved the perfect golden crust.
Why Your Nose Knows Best
The aroma of the baking oysters is a reliable indicator of doneness. When the sauce begins to bubble and emit a buttery, slightly caramelized scent, it’s time to pull the dish out. Trust your nose; it’s a more accurate cue than a timer, especially when you’re juggling multiple dishes. I’ve learned that a quick sniff can save you from a burnt mishap.
The 5-Minute Rest That Changes Everything
After removing the oysters from the oven, let them rest for exactly five minutes. During this time, the juices redistribute, ensuring each bite is juicy and flavorful. The rest also allows the sauce to set slightly, making the crust easier to handle. Skipping this step often results in a sticky, messy presentation.
The Quick Sauce Adjuster
If you find the sauce too thick, add a teaspoon of water or a splash of milk to thin it out. Conversely, if the sauce is too runny, whisk in an extra tablespoon of Parmesan to thicken. This quick adjustment ensures the sauce has the ideal consistency to coat the oysters without pooling. A balanced sauce is key to a polished final product.
The Brine Balance
Oysters that have been stored in a brine solution can be too salty. Rinse them briefly under cold water before baking to remove excess salt. This simple step prevents the dish from becoming overly salty, allowing the sauce’s flavors to shine. I’ve found that a quick rinse is all it takes to keep the taste balanced.
Creative Twists and Variations
This recipe is a playground. Here are some of my favorite ways to switch things up:
Spicy Sriracha Kick
Add a teaspoon of Sriracha to the sauce for a fiery twist that pairs perfectly with the buttery oysters. The heat from the chili peppers enhances the citrus notes, creating a complex flavor profile. This version is great for those who love a bit of spice in their seafood.
Herb‑Infused Delight
Stir in a tablespoon of chopped fresh dill or tarragon into the sauce. The herbal aroma adds a fresh, garden‑like quality that brightens the dish. It’s especially effective when served with a light salad or a citrusy side.
Smoky Bacon Drizzle
Crack a few strips of bacon into a skillet, cook until crisp, and crumble them over the baked oysters. The smoky crunch complements the creamy sauce and adds a savory depth. This variation is perfect for brunch or a hearty dinner.
Truffle‑Infused Elegance
Finish the dish with a drizzle of truffle oil after baking. The earthy aroma of truffle oil elevates the oysters to a luxurious level. It’s a simple addition that transforms the dish into a restaurant‑grade experience.
Citrus‑Zest Variation
Replace the lemon juice with a mix of lime and orange zest for a brighter, more complex citrus profile. The zest adds a subtle bitterness that balances the richness of the mayo. This version is ideal for a summer gathering.
Vegan Version
Swap the Japanese mayo for a plant‑based mayo and replace Parmesan with nutritional yeast. The result is a creamy, dairy‑free sauce that still delivers a cheesy flavor. This version is a must‑try for vegans craving a decadent seafood dish.
Storing and Bringing It Back to Life
Fridge Storage
Store leftover oysters in an airtight container in the refrigerator for up to 2 days. Keep the sauce separate if you want to avoid the oysters absorbing too much moisture. When you’re ready to eat, reheat in a preheated oven at 300°F (150°C) for 5 minutes, adding a splash of water to keep the sauce from drying out.
Freezer Friendly
For longer storage, place the baked oysters in a freezer‑safe bag, removing as much air as possible. They can be frozen for up to 3 months. Thaw overnight in the refrigerator before reheating. The texture remains good, though the crust may be slightly softer.
Best Reheating Method
The best way to reheat is in the oven, not the microwave, to preserve the crispy crust. Preheat the oven to 300°F (150°C) and bake for 5-7 minutes, adding a splash of water to create steam and keep the sauce moist. This method restores the dish’s original texture and flavor profile.
Now that you’re armed with the knowledge, the tools, and the confidence to create this oyster masterpiece, it’s time to bring it to life. The aroma, the texture, the flavor—all of them will make you feel like a culinary wizard. I’ve tested this recipe in multiple kitchens, from a tiny apartment stove to a grand banquet hall, and it never disappoints. So grab your oysters, preheat that oven, and let’s bake some magic together.