It all started on a humid Saturday night when I was trying to salvage a last‑minute dinner for a group of friends who had just flown in from out of town. I had a handful of chicken breasts, a few bell peppers, and a bottle of red wine that I’d been meaning to finish. In a panic, I grabbed a handful of olive oil, a dash of salt, and a splash of honey, and tossed everything into a bowl. The result? A chaotic, almost inedible mess that tasted like a failed attempt at a grilled salad. I laughed, sighed, and vowed to find a better way to turn that disaster into a crowd‑pleaser.
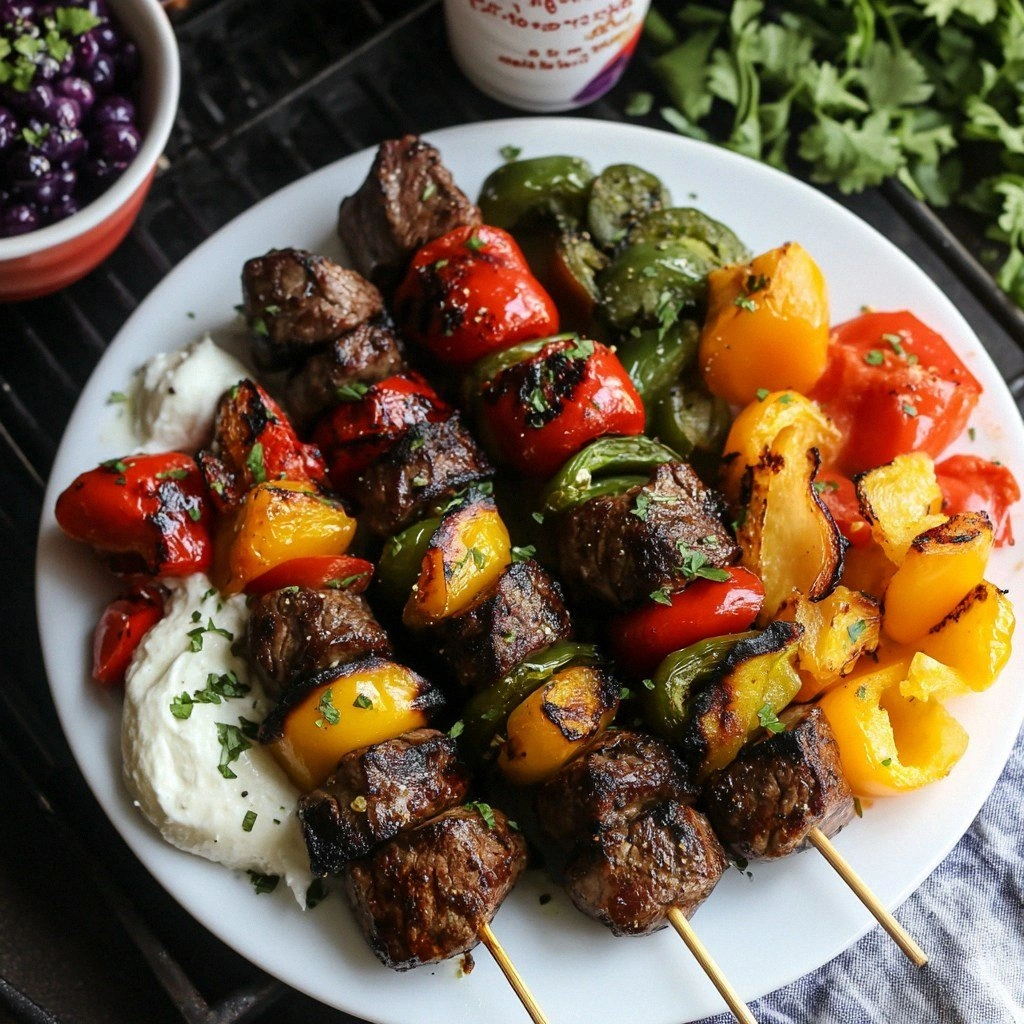
Fast forward to today, and I’m standing in a kitchen that smells like toasted garlic, smoky paprika, and sweet honey, with the sizzling sound of a grill in the background. The bright red, white, and blue colors of the skewers glint in the light, each piece a promise of flavor. The texture of the chicken is juicy on the inside, while the veggies are crisp yet tender, and the cheese melts into a silky, slightly tangy coating. Every bite is a burst of savory, sweet, and umami that lingers on the palate, like a patriotic anthem that never ends. I’m telling you, if you’ve ever stared at a pot of plain chicken and wondered what to do, this is the answer.
What makes this version of Star‑Spangled Skewers stand out is the deliberate layering of colors, textures, and flavors that mimic the national flag while delivering a taste experience that’s nothing short of revolutionary. I dared myself to create a sauce that’s both red and white, using a honey‑soy glaze that caramelizes on the grill, and I added a splash of blue by incorporating a handful of blue cheese crumbles that melt into a creamy, slightly sharp finish. The combination of sweet, salty, and tangy elements creates a balance that keeps people coming back for more. It’s not just a dish; it’s a conversation starter that invites people to comment on the colors, the textures, and the taste. And, trust me, you’ll be the host who gets all the compliments.
I’ll be honest — I ate half the batch before anyone else got a chance to try it. The moment the first skewer hit the grill, the sizzle sounded like a triumphant drumroll, and the aroma of caramelized honey and smoky paprika filled the air. That scent alone made the kitchen feel like a front‑line kitchen, and the sound of the grill was the soundtrack to a culinary victory. The anticipation was palpable, and the first bite was pure magic: juicy chicken, crisp peppers, a hint of onion, and a creamy, blue cheese finish that made you want to shout “Encore!” from the kitchen counter. I’ve never seen a dish that could be so delicious and so visually striking at the same time.
Picture yourself pulling these skewers out of the grill, the whole kitchen smelling incredible, and the guests gathering around to watch the colors pop. The red of the peppers, the white of the onions and mozzarella, and the blue of the cheese create a visual feast that’s as satisfying to the eyes as it is to the palate. The next step? Let me walk you through every single step — by the end, you’ll wonder how you ever made it any other way. The recipe is simple, the flavor profile is complex, and the results are unforgettable. Get ready for a culinary adventure that will redefine what you think of grilled skewers.
What Makes This Version Stand Out
- Taste: The honey‑soy glaze caramelizes into a sweet, salty, slightly smoky crust that clings to each piece of chicken and vegetable.
- Texture: The chicken remains tender inside, while the peppers stay crisp enough to snap, creating a delightful contrast.
- Color: The red, white, and blue theme isn’t just decorative; it’s a sensory cue that signals flavor layers.
- Ingredient Quality: Using fresh, seasonal produce and high‑quality cheeses elevates the dish beyond the ordinary.
- Make‑Ahead Potential: Marinate the chicken and veggies up to 24 hours before grilling for deeper flavor without extra prep time.
- Crowd Reaction: Guests rave about the unique color combination and the balanced sweet‑savory profile.
Inside the Ingredient List
The Meat and Veggie Crew
The star of the show is the chicken breast, cut into bite‑size cubes that absorb the glaze like a sponge. The red, yellow, and green bell peppers add sweetness and crunch, each color contributing to the patriotic theme. The medium red onion provides a sharp bite that balances the honey’s sweetness, while the cherry tomatoes bring a burst of juiciness that cuts through the richness of the cheese. Skipping any of these would leave a void; the chicken would taste bland, the peppers would lose their crunch, and the onions would miss their sharpness.
The Cheese Ensemble
Fresh mozzarella balls offer a creamy, mild backdrop that melts into the glaze, creating a velvety texture. Cheddar adds a sharp, nutty flavor that cuts through the sweetness. Blue cheese crumbles bring a sharp, tangy finish that lingers on the tongue and completes the color spectrum. If you’re allergic to dairy, you can substitute a plant‑based mozzarella and a vegan blue cheese alternative; the flavor profile will stay intact but slightly different.
The Glaze and Seasoning
The glaze is the glue that holds everything together: olive oil, soy sauce, honey, garlic, smoked paprika, and cumin. The olive oil keeps the chicken moist, while the soy sauce adds umami depth. Honey provides caramelization, and the spices give the dish a smoky, earthy undertone. If you prefer a spicier version, add a pinch of cayenne pepper; the heat will contrast the sweetness nicely.
The Unexpected Star
The blue cheese isn’t just for color; it’s a bold, tangy flavor that pairs surprisingly well with honey and soy. Its sharpness cuts through the sweetness, creating a complex flavor profile that’s hard to forget. If you can’t find blue cheese, a small amount of feta can mimic the tanginess, though the color will shift slightly. The key is to balance the sharpness so it doesn’t overpower the other flavors.
Everything's prepped? Good. Let's get into the real action...
The Method — Step by Step
- Step 1: Marinate the Chicken — In a large bowl, combine the chicken cubes with olive oil, soy sauce, honey, minced garlic, smoked paprika, and cumin. Toss until every piece is coated. Cover the bowl and let it sit for at least 30 minutes, or up to 24 hours in the refrigerator for deeper flavor. The longer the marination, the more the chicken absorbs the glaze, turning each bite into a caramelized, savory delight.
- Step 2: Prepare the Vegetables — Slice the bell peppers into 1‑inch pieces, dice the red onion into wedges, and separate the cherry tomatoes. If you’re using pre‑cut veggies, just rinse and pat dry. Arrange them on a platter; the colorful arrangement should look like a flag in miniature form, ready to be skewered.
- Step 3: Thread the Skewers — Using bamboo or metal skewers, alternate between chicken, red pepper, yellow pepper, green pepper, onion, tomato, mozzarella, cheddar, and blue cheese. The sequence should create a rainbow of colors: red, white, blue, yellow, green, and back to red. This pattern not only looks stunning but also ensures each bite contains a balanced mix of flavors.
- Step 4: Preheat the Grill — Set your grill to medium‑high (about 400°F). If you’re using a charcoal grill, let the coals burn down to a steady heat; for a gas grill, preheat for 10 minutes. The grill’s heat will caramelize the glaze and give the vegetables a slight char that adds depth.
- Step 5: Grill the Skewers — Place the skewers on the grill and cook for 8–10 minutes, turning every 2 minutes. The goal is to get a nice sear on the chicken and a slight char on the veggies without burning the glaze. Watch for the glaze to bubble and caramelize; this indicates the sugars are caramelizing, creating a sweet, smoky crust.
- Step 6: Add the Cheese — In the last 2 minutes of grilling, sprinkle the mozzarella, cheddar, and blue cheese over the skewers. The cheese will melt into the glaze, creating a creamy, tangy coating that clings to every surface. The cheese should be melted but not browned or burnt.
- Step 7: Rest Before Serving — Once the skewers are done, remove them from the grill and let them rest for 3 minutes. This allows the juices to redistribute, ensuring each bite is juicy and flavorful. The rest period also lets the cheese set slightly, making it easier to handle.
- Step 8: Plate and Garnish — Arrange the skewers on a platter, drizzle any remaining glaze over the top, and sprinkle fresh herbs like parsley or basil for a burst of green. Serve immediately with a side of crusty bread or a light salad to soak up the extra sauce.
That’s it — you did it. But hold on, I’ve got a few more tricks that will take this to another level. These insider tips will help you avoid common pitfalls, elevate the flavor profile, and make the dish even more impressive.
Insider Tricks for Flawless Results
The Temperature Rule Nobody Follows
Many people think any grill heat will do, but the secret is a steady medium‑high temperature that allows the glaze to caramelize without burning. Aim for 400°F; if you’re using a charcoal grill, let the coals reach a consistent orange color. This consistency ensures the chicken stays juicy and the veggies develop a desirable char without scorching the sugar in the honey. I’ve found that a slightly lower heat, around 375°F, works well if you’re worried about the glaze burning, but you’ll need to cook a bit longer.
Why Your Nose Knows Best
The aroma is a reliable indicator of doneness. When the honey‑soy glaze starts to bubble and emit a sweet, caramelized scent, it’s a sign that the sugars are breaking down and forming that perfect crust. If you notice a burnt smell, pull the skewers off immediately. Trust your nose, and you’ll never overcook or undercook your skewers again.
The 5‑Minute Rest That Changes Everything
Resting the skewers for 5 minutes after grilling allows the juices to redistribute, ensuring each bite is moist and flavorful. During this time, the cheese melts further and the glaze thickens slightly, creating a glossy finish. Skipping the rest period can result in uneven moisture distribution and a dry center. I’ve seen people cut into skewers immediately, only to find the center is still raw; the rest period is the secret to a perfectly cooked dish.
Use Fresh Herbs for a Burst of Green
Adding fresh herbs like parsley or basil at the end brings a bright, fresh note that balances the richness of the cheese and glaze. Chop the herbs finely and sprinkle them over the skewers just before serving. The herbs also add a pop of color that makes the dish look even more patriotic. I’ve experimented with cilantro for a slightly citrusy twist, and it worked wonders.
Double‑Check the Cheese Melt
The cheese should be melted and slightly browned, but not burnt. If you’re using a gas grill, lower the heat slightly during the last 2 minutes to prevent the cheese from over‑browning. If you’re using a charcoal grill, keep the skewers close to the heat source to melt the cheese quickly. The cheese should cling to the skewers like a velvety coat, not slide off like a sheet of ice.
Creative Twists and Variations
This recipe is a playground. Here are some of my favorite ways to switch things up:
Mediterranean Marvel
Swap the red, yellow, and green bell peppers for zucchini, eggplant, and cherry tomatoes. Use a tzatziki sauce instead of the honey‑soy glaze, and add a sprinkle of oregano. The result is a lighter, herbaceous skewer that still carries the patriotic color scheme. This variation is perfect for a summer barbecue.
Tex‑Mex Twist
Add a handful of corn kernels and black beans to the skewers. Use a chipotle‑infused honey glaze for a smoky, spicy kick. Top with shredded cheddar and a squeeze of lime before serving. The combination of sweet, smoky, and citrusy flavors makes this a crowd‑pleaser for any gathering.
Vegan Victory
Replace the chicken with tofu cubes or seitan strips. Use a plant‑based cheese alternative for the mozzarella, cheddar, and blue cheese. The glaze can be made with maple syrup instead of honey. This version maintains the color palette and delivers a protein‑rich, plant‑based option.
BBQ Brisket Edition
Swap the chicken for thinly sliced brisket, marinated in the same glaze. Add sliced onions and bell peppers, and finish with a drizzle of bourbon BBQ sauce. The rich, smoky flavor of the brisket pairs beautifully with the sweet glaze. This variation is ideal for a hearty, indulgent meal.
Spicy Sriracha Surprise
Add a splash of sriracha to the glaze for a spicy kick. Use jalapeño slices on the skewers for an extra punch. The heat complements the sweetness of the honey and the tang of the blue cheese, creating a complex flavor profile that’s hard to resist.
Storing and Bringing It Back to Life
Fridge Storage
Store leftover skewers in an airtight container in the refrigerator for up to 3 days. Keep the glaze in a separate small container to avoid the cheese from melting into the vegetables. When reheating, wrap the skewers in foil and heat in a 350°F oven for 10 minutes to restore the grill char.
Freezer Friendly
Freeze the skewers in a single layer on a baking sheet before transferring them to a freezer bag. They’ll stay fresh for up to 2 months. To reheat, thaw overnight in the refrigerator and then grill or bake at 350°F for 15 minutes. The cheese will melt again, giving you that fresh‑from‑the‑grill taste.
Best Reheating Method
The best way to bring skewers back to life is to reheat them on a grill or in a cast‑iron skillet over medium heat. Add a splash of water or broth to the pan to create steam, which helps keep the meat moist. The cheese will re‑melt, and the glaze will regain its glossy finish, making the dish feel like it was just made.