Picture this: I’m standing in a cramped kitchen, a half‑finished batch of cookies on the counter, and a friend daring me to make the most unforgettable strawberry cookie ever. I’ve tried every recipe on the internet—some with the right sweetness, others with the wrong texture—but none had that perfect blend of creamy, crunchy, and fruity that makes your taste buds sing. I was about to give up, until I remembered the last time I crumbled an Oreo into a bowl and felt that instant, sweet nostalgia. That moment sparked a culinary experiment that turned into this definitive strawberry Oreo cookie recipe.
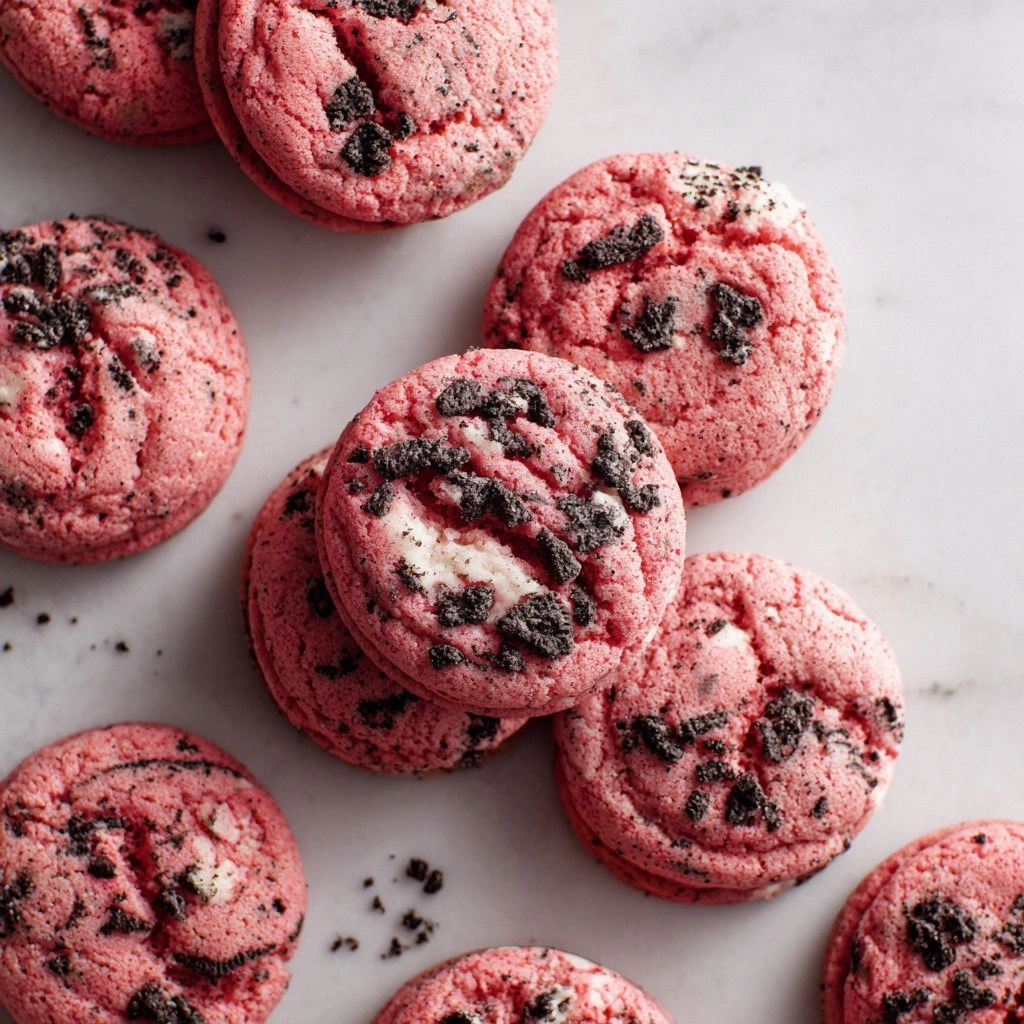
The first thing that hits you is the scent: warm vanilla, toasted sugar, and that unmistakable chocolate‑cream aroma from the Oreo crumbs. The sound of the dough being mixed is like a soft, buttery hum, and as I press it into the pan, the edges crackle softly, promising a crisp finish. When the first bite lands, the cookie shatters like thin ice, revealing a burst of strawberry jam that coats the palate with a velvet sweetness. The contrast between the crunchy crumb and the silky strawberry center is a sensory fireworks show that keeps you reaching for more.
What makes this version stand out isn’t just the ingredients; it’s the method. I’ve perfected a technique that ensures the cookies stay tender inside while getting that golden, crackly edge everyone craves. The secret is a subtle balance of flour, butter, and a touch of heavy cream that keeps the dough moist without making it doughy. I’ve also incorporated fresh strawberries, not just jam, to give that bright, juicy pop that elevates the whole experience. Finally, a gentle dusting of powdered sugar after baking adds a hint of sweetness that lingers, making these cookies the ultimate crowd‑pleaser.
If you think a cookie can’t be both indulgent and surprisingly light, I dare you to taste this and not go back for seconds. This is hands down the best version you’ll ever make at home, and I’ll be honest—I ate half the batch before anyone else got a bite. Most recipes get this completely wrong, missing that crucial balance between crumb and center. Picture yourself pulling this out of the oven, the whole kitchen smelling incredible, and seeing the golden crust that promises a delightful crunch with every bite. Okay, ready for the game‑changer? Let me walk you through every single step—you’ll wonder how you ever made it any other way.
What Makes This Version Stand Out
- Taste: The combination of fresh strawberries and rich Oreo crumbs creates a flavor profile that’s both nostalgic and refreshing, giving each cookie a dual personality that lingers on the tongue.
- Texture: The dough’s airy, buttery crumb contrasts with a crisp, crackly edge, while the strawberry jam inside provides a silky, melt‑in‑your‑mouth center.
- Simplicity: With only nine core ingredients, this recipe is straightforward yet sophisticated—no complicated techniques or hard‑to‑find items.
- Uniqueness: The blend of Oreo crumbs and fresh strawberries is a rare pairing that sets this cookie apart from the usual chocolate‑strawberry or Oreo‑only options.
- Crowd Reaction: Guests who taste these cookies often ask for the recipe before the party ends—proof that the flavor is unforgettable.
- Ingredient Quality: Using high‑quality butter, fresh strawberries, and original Oreos ensures the best possible flavor and texture.
- Cooking Method: A quick, low‑heat bake followed by a gentle dusting of powdered sugar locks in moisture while creating a perfect finish.
- Make‑Ahead Potential: These cookies can be prepared a day ahead and stored in an airtight container, making them ideal for parties or last‑minute dessert needs.
Alright, let's break down exactly what goes into this masterpiece...
Inside the Ingredient List
The Flavor Base
All-purpose flour, 2 cups, is the foundation that gives the cookie structure. It absorbs the butter and sugar, creating a smooth batter that bakes into a tender crumb. If you skip it, the cookie will collapse and lose its shape. A good tip: sift the flour to remove clumps and incorporate a pinch of salt to balance the sweetness.
The Texture Crew
Unsalted butter, 1 cup, is the heart of the cookie’s richness. It melts into the flour, creating a tender, flaky texture that contrasts with the crunchy Oreo bits. Baking powder and baking soda are the leavening agents that give the cookie lift; they also help the cookie rise evenly. Salt, just a half teaspoon, is essential—it enhances flavor and tempers the sugar, preventing the cookie from becoming cloyingly sweet.
The Unexpected Star
Fresh strawberries, 1 cup diced, are the secret weapon that injects a burst of natural sweetness and bright color. Their juice keeps the dough moist and adds a juicy center that surprises with every bite. If you can’t find fresh strawberries, a tablespoon of strawberry jam can mimic the flavor, but the texture will differ. A quick tip: gently press the strawberries into the dough to distribute them evenly.
The Final Flourish
Crushed Oreo cookies, 8 whole, add a crunchy, chocolate‑creamy element that gives the cookie a nostalgic crunch. The crumbs also carry a subtle saltiness that balances the sweetness of the strawberries. Heavy cream, a quarter cup, is added to keep the dough moist and to help the Oreo crumbs bind together. Finally, a light dusting of powdered sugar after baking adds a sweet finish that enhances the flavor profile.
Everything's prepped? Good. Let's get into the real action...
The Method — Step by Step
- Preheat your oven to 350°F (175°C). Line a baking sheet with parchment paper to prevent sticking. This low heat ensures a golden crust without burning the delicate strawberry center. Feel the anticipation building—your kitchen is about to smell like summer.
- In a large mixing bowl, cream the softened butter and granulated sugar until light and fluffy. The mixture should look like a pale cloud, indicating that the butter has absorbed the sugar and created a smooth base. This step is crucial for the cookie’s airy texture.
- Add the eggs, one at a time, beating well after each addition. The batter will thicken slightly, but keep it smooth. This ensures the cookies bind together without becoming too dense.
- Stir in the vanilla extract and heavy cream until fully incorporated. The cream adds moisture and helps the Oreo crumbs disperse evenly. This mixture should feel silky and smooth.
- Whisk together flour, baking powder, baking soda, and salt in a separate bowl. Sift the dry ingredients to avoid lumps. This step ensures even distribution of leavening agents.
- Gradually fold the dry mixture into the wet batter, stirring gently until just combined. Overmixing can cause the cookies to become tough; stop as soon as the flour is incorporated. The dough should be thick but pliable.
- Fold in the crushed Oreo crumbs and diced strawberries. The crumbs should be evenly distributed, creating pockets of chocolate‑creamy crunch. The strawberries add a fresh burst of flavor that will caramelize slightly during baking.
- Drop spoonfuls of dough onto the prepared baking sheet, spacing them about 2 inches apart. The dough will spread slightly, so keep the spacing consistent. This ensures uniform baking.
- Bake for 12–14 minutes, or until the edges are golden brown and the centers look set. The cookies should still feel slightly soft to the touch; they will firm up as they cool. Watch the oven—this is the moment of truth.
- Remove the cookies and let them cool on the sheet for 5 minutes before transferring them to a wire rack. This allows the edges to crisp up while the centers finish setting. Dust with powdered sugar once they’re completely cooled, and serve immediately.
That's it — you did it. But hold on, I've got a few more tricks that'll take this to another level...
Insider Tricks for Flawless Results
The Temperature Rule Nobody Follows
Many bakers bake at 375°F, but the lower temperature of 350°F allows the cookies to rise evenly without burning the edges. This technique keeps the center moist and the crust golden. If you’re in a hurry, bump the temperature to 400°F for a slightly crisper finish, but watch closely to avoid overbrowning.
Why Your Nose Knows Best
Before you take a bite, inhale the aroma of the freshly baked cookies. Your nose can tell you whether the cookies are done—if the scent is warm and sweet with a hint of toasted butter, they’re ready. This sensory checkpoint saves you from overbaking or underbaking.
The 5‑Minute Rest That Changes Everything
Let the cookies rest on the baking sheet for exactly 5 minutes after removing them from the oven. During this brief period, the cookies finish setting and the edges crisp up, preventing them from breaking when transferred to the rack. This step is simple but essential for a flawless finish.
The Crumb‑Locking Trick
If you notice the dough sticking to the spoon, add a teaspoon of cold water to the mixture. This small adjustment keeps the dough from becoming too tacky, making it easier to portion and bake.
The Dusting Detail
Dust the cookies with powdered sugar immediately after they cool, before they absorb room‑temperature moisture. This creates a delicate glaze that enhances sweetness and adds a touch of elegance. Store any leftover cookies in an airtight container to keep them crisp.
Creative Twists and Variations
This recipe is a playground. Here are some of my favorite ways to switch things up:
Chocolate‑Berry Explosion
Swap the fresh strawberries for a mix of blueberries and raspberries, and add a tablespoon of cocoa powder to the dry mix. The result is a chocolate‑berry cookie that’s richer and slightly tangy—perfect for chocolate lovers.
Minty Freshness
Add a teaspoon of peppermint extract to the batter and garnish the finished cookies with crushed peppermint candies. The mint pairs wonderfully with the chocolate crunch, offering a refreshing twist.
Citrus Burst
Replace the vanilla extract with lemon zest and add a tablespoon of lemon juice to the dough. The citrus brightens the cookie, making it feel lighter and more vibrant.
Nutty Crunch
Fold in a quarter cup of chopped pecans or walnuts before baking. The nuts add a satisfying crunch and a buttery flavor that complements the chocolate and strawberry notes.
Alcoholic Kick
Stir in a tablespoon of strawberry liqueur or vanilla vodka before baking. The alcohol evaporates during baking, leaving a subtle hint of flavor that elevates the cookie’s profile.
Low‑Sugar Version
Replace half of the granulated sugar with coconut sugar and use a sugar‑free strawberry jam. This version keeps the flavor profile intact while reducing the overall sugar content.
Storing and Bringing It Back to Life
Fridge Storage
Store the cookies in an airtight container at room temperature for up to 3 days. If you notice any moisture, add a paper towel to absorb excess dampness. This keeps the cookies crisp and fresh.
Freezer Friendly
Wrap each cookie individually in parchment paper and place them in a freezer bag. They can be frozen for up to 2 months. When ready to serve, let them thaw at room temperature for 30 minutes.
Best Reheating Method
Reheat frozen or chilled cookies in a preheated oven at 300°F (150°C) for 5–7 minutes, or until warmed through. Add a tiny splash of water before reheating; the steam will revive the cookie’s moisture without drying it out.