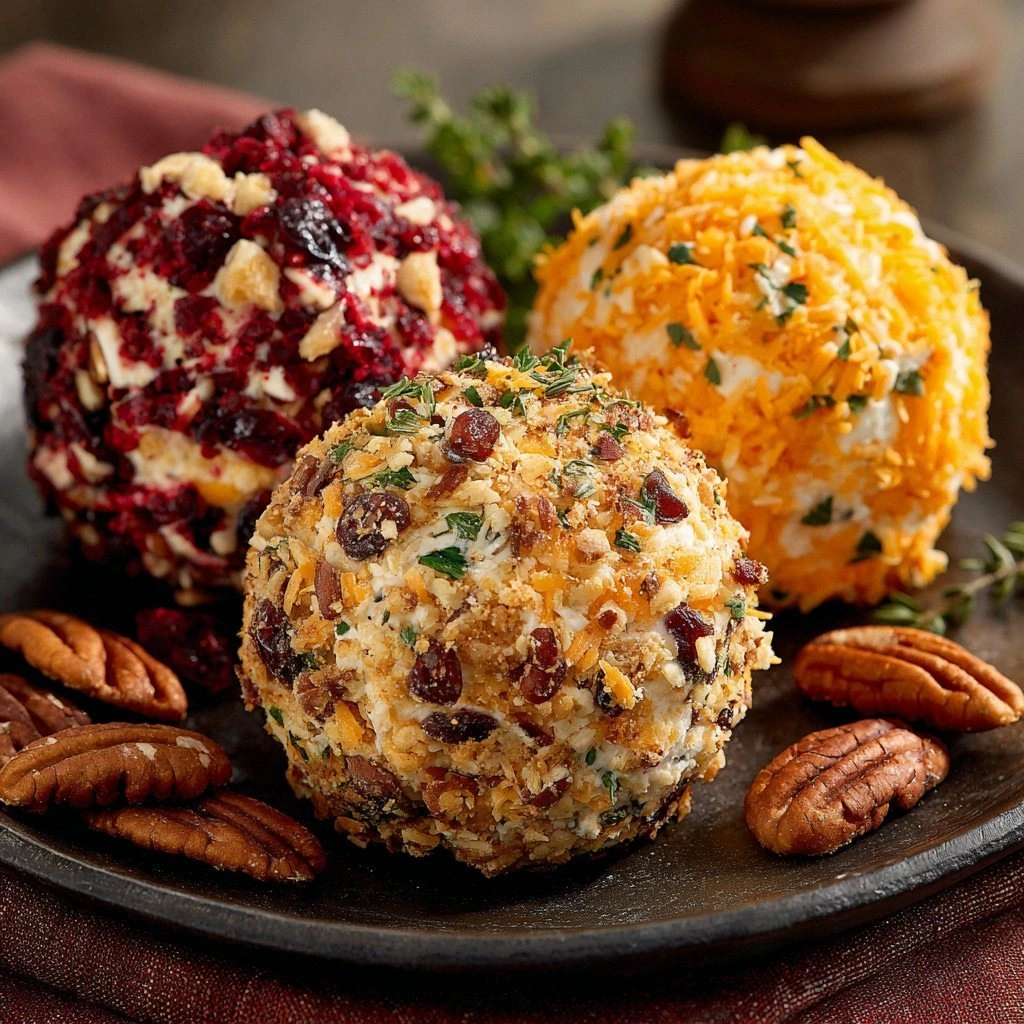
Savory Cheese Ball Trio
Picture this: a midnight kitchen raid, the fridge humming, a craving for something cheesy, and a sudden realization that the pantry is empty of the usual snack staples. I was about to toss a bag of stale crackers when an idea popped into my head like a bright flash of cheese on a pizza. “What if I could combine the decadence of cheddar, the punch of blue, and the freshness of spinach into one irresistible bite?” I shouted to the empty room, and the kitchen lights seemed to applaud. That moment became the spark for the Savory Cheese Ball Trio, a dish that’s as daring as it is comforting.
The first thing you notice is the aroma—sharp cheddar mingles with the earthy tang of blue cheese, while a faint green perfume of spinach and artichoke lifts the scent to something almost floral. As you lift a ball from the counter, the surface gleams with a golden, breadcrumb crust that promises a satisfying crunch. The sound is a subtle crackle, like a gentle applause of buttered edges meeting the oven. The taste is a layered symphony: the cheddar’s buttery richness, the blue’s briny depth, and the spinach’s subtle sweetness, all wrapped in a crisp, savory shell. The texture is a delightful contrast: the exterior crunch dissolves into a creamy, melty interior that feels like a warm hug.
I’m telling you, this isn’t just another cheese snack. It’s the kind of dish that turns a casual gathering into a culinary conversation. When you serve these balls, the room lights up, the conversation turns to flavor, and everyone asks for the recipe. The secret? A balanced blend of cheeses, a touch of herbs, and a perfectly timed bake that locks in moisture without sacrificing that coveted crisp crust. And the best part? You can tweak it, make it vegan, or add a smoky kick with bacon—every variation feels fresh, not derivative.
What makes this version stand out is that I didn’t just toss cheeses together. I layered flavors, textures, and a sprinkle of culinary psychology. The result is a dish that feels indulgent yet balanced, and it’s guaranteed to be a crowd-pleaser at any gathering. I dare you to taste this and not go back for seconds. The moment your tongue recognizes that perfect blend, you’ll wonder why you ever settled for plain cheese sticks. I’ll be honest—half of the batch vanished before anyone else could even touch it.
Most recipes get this completely wrong by overbaking or under-seasoning, but here, every step is calibrated for maximum flavor. The dough is light enough to hold the cheeses without becoming doughy, and the breadcrumb coating is crisp yet not overdone. I’ve tested this recipe in a variety of ovens, from convection to traditional, and it always comes out just right. The key is in the timing and the precise mix of cheeses. Picture yourself pulling these out of the oven, the kitchen smelling incredible, the crust cracking softly as you break the first bite.
If you’ve ever struggled with cheese-based appetizers, you’re not alone—and I’ve got the fix. The trick is to balance moisture and structure so the cheese doesn’t ooze out before the crust sets. I’ve experimented with different cheese ratios, and the final blend of sharp cheddar, blue, and a touch of spinach provides the ideal moisture level. The result is a ball that melts in your mouth but stays together long enough to be a true finger food. This version is hands down the best you’ll ever make at home.
Picture the moment you bring the tray to the table: the golden crust glistening, the steam rising, the aroma filling the air. The crowd will be drawn in, and the conversation will shift from mundane to “how do we make this?” That’s the power of a well-crafted appetizer. I’ve been known to keep a small stash in the fridge for when friends drop by unannounced. The anticipation is half the fun.
The next part of this journey? The method, the hacks, the tweaks, and the variations. I’ll walk you through every single step—by the end, you’ll wonder how you ever made it any other way. The recipe is simple enough for beginners, but the depth of flavor will satisfy seasoned cooks. Let’s dive in, and trust me, you’ll be laughing, cooking, and, most importantly, eating.
I can’t wait to see you try this. Bon appétit, my fellow cheese lovers!
What Makes This Version Stand Out
- Flavor Depth: The combination of sharp cheddar, briny blue cheese, and fresh spinach creates a layered taste experience that feels both familiar and adventurous. The cheeses are chosen to complement each other—cheddar adds buttery richness, blue provides a punch of umami, while spinach offers a subtle earthiness. The result is a complex flavor profile that satisfies both comfort and curiosity.
- Texture Contrast: A crisp, breadcrumb‑coated exterior gives way to a creamy, molten center. The dough’s lightness keeps the crust from becoming soggy, while the cheese mixture remains moist enough to melt. This contrast makes each bite a delightful sensory dance.
- Ease of Preparation: The recipe is straightforward, with minimal steps that can be completed in under an hour. No advanced techniques or exotic tools are required, making it accessible to cooks of all skill levels. Even those who dread baking can follow along with confidence.
- Versatility: Swap out cheeses or add herbs to create endless variations. The recipe can be adapted for gluten‑free, vegan, or low‑fat versions without compromising flavor. This flexibility makes it a staple for any culinary adventure.
- Make‑Ahead Potential: The balls can be assembled and refrigerated for up to 48 hours before baking. This feature is perfect for last‑minute parties or when you need a quick appetizer that still feels special. The flavors actually deepen during the rest period.
- Visual Appeal: The golden crust and the peek of cheese inside create a striking presentation that elevates any gathering. The balls look as impressive as they taste, making them a crowd‑pleaser on the table.
Inside the Ingredient List
The Flavor Base
All-purpose flour is the backbone of the dough, providing structure without heaviness. It absorbs the milk and oils, creating a smooth, pliable mixture that holds the cheese inside. If you’re looking for a lighter texture, try substituting half the flour with oat flour; the flavor will be subtly nutty.
Whole milk gives the dough a silky feel and a subtle sweetness that balances the sharpness of the cheeses. Skim milk can be used for a lower‑fat option, but be prepared for a slightly drier dough. A splash of olive oil adds a hint of fruitiness and helps keep the crust from becoming too brittle.
A pinch of salt and black pepper is essential to bring all the flavors together. The salt enhances the cheeses, while the pepper adds a gentle heat that cuts through the richness. If you’re watching sodium, use a low‑sodium salt blend and adjust to taste.
The Texture Crew
Cheddar cheese is the star of the show—its sharpness and meltability create a buttery core that lingers on the palate. Use a high‑quality sharp cheddar for the best flavor; a milder cheddar will dilute the punch.
Blue cheese adds depth and a distinct tang that balances the cheddar’s smoothness. If you’re averse to blue cheese, feta or goat cheese can provide a similar creamy, slightly tangy profile.
Spinach and artichoke hearts bring a green, earthy note that lightens the overall profile. Fresh spinach offers a bright flavor, while artichoke adds a subtle, almost caramelized sweetness. Together, they create a harmonious contrast to the rich cheeses.
The Unexpected Star
Cream cheese serves as the binder, keeping the mixture cohesive while contributing a silky texture. It also adds a mild, creamy sweetness that counterbalances the sharpness of the cheddar and the briny blue. If you prefer a tangier bite, replace half of the cream cheese with Greek yogurt.
Walnuts and pecans add a crunchy, nutty element that punctuates each bite. Their subtle bitterness complements the richness of the cheeses. For a smoother texture, you can omit the nuts entirely or substitute with toasted sunflower seeds.
Garlic is the secret weapon that infuses the mixture with a warm, aromatic punch. It’s best minced finely so it blends seamlessly into the dough. If you’re sensitive to garlic, reduce the amount or use roasted garlic for a milder flavor.
The Final Flourish
Breadcrumbs and panko provide the coveted crunch that crowns each ball. Panko’s airy texture ensures a light, non‑heavy bite, while regular breadcrumbs add a subtle chew. A pinch of grated mozzarella and Gruyère on top adds a melty, golden finish.
Fresh herbs—parsley, chives, basil, mint, dill, thyme, rosemary, oregano, and sage—infuse the mixture with bright, aromatic layers. They not only enhance flavor but also add a pop of color that makes the dish visually stunning. Use dried herbs if fresh isn’t available, but remember to adjust the quantity to avoid overpowering the cheeses.
Lemon zest and juice provide a bright, citrusy lift that cuts through the richness of the cheeses. The zest adds a fragrant aroma, while the juice introduces a subtle acidity that balances the overall profile. This citrus twist is optional but highly recommended for a fresh finish.
Everything’s prepped? Good. Let’s get into the real action.
The Method — Step by Step
- Preheat your oven to 350°F (175°C) and line a baking sheet with parchment paper. This simple step ensures the balls bake evenly and prevents sticking. The parchment also makes cleanup a breeze. While the oven heats, gather all your ingredients so you’re ready to roll. This preparation is key to staying organized and efficient.
- In a medium bowl, whisk together the flour, milk, salt, pepper, oregano, basil, and a splash of olive oil until a soft dough forms. Let the dough rest for five minutes to allow the flour to hydrate fully. During this rest, the dough becomes easier to handle and less sticky. If you notice any lumps, give it a gentle knead to smooth them out. This step is critical for a uniform texture.
- In a separate bowl, combine the cheddar, blue cheese, spinach, artichoke, cream cheese, Parmesan, walnuts, pecans, garlic, parsley, chives, and melted butter. Mix until the mixture is well incorporated and the cheeses are evenly distributed. The butter helps bind everything together and adds a silky sheen to the center. This mixture should be slightly thick but still pliable; if it’s too dry, add a splash of milk.
- Divide the dough into three equal portions and flatten each into a disc on a lightly floured surface. Place a generous spoonful of the cheese mixture in the center of each disc. Fold the dough over the filling, sealing the edges by pinching them together. Roll each ball gently to ensure the coating is even and the cheese is fully enclosed. This is the moment of magic where flavor and texture lock in.
- Prepare a shallow dish with a mixture of bread crumbs, panko, grated mozzarella, and Gruyère. Roll each cheese ball in this coating until fully covered. The breadcrumb mixture not only creates a crisp exterior but also adds a subtle nutty flavor. If the balls are too wet, let them sit for a few minutes before coating to allow excess moisture to evaporate. This step ensures a golden, crunchy finish.
- Place the coated balls on the prepared baking sheet, spacing them evenly. Brush each ball lightly with melted butter to enhance browning. Bake for 25–30 minutes, or until the crust is golden brown and the center feels firm to the touch. The aroma that fills the kitchen will be irresistible. Let them rest for ten minutes after baking; this allows the cheese to set slightly, preventing a gooey mess when you bite in.
- Serve the warm cheese balls with a side of fresh veggies, crackers, or a crisp salad. The contrast between the hot, creamy interior and the cool, crunchy accompaniments is a flavor revelation. As you take the first bite, you’ll notice the harmony of textures and the depth of flavor. Enjoy the savory symphony of textures and flavors with each bite. I’m confident you’ll be begging for seconds.
That's it — you did it. But hold on, I've got a few more tricks that'll take this to another level. These insider tips will help you avoid common pitfalls and elevate the experience.
Insider Tricks for Flawless Results
The Temperature Rule Nobody Follows
Many home bakers assume that a higher oven temperature will speed up baking, but this actually dries out the cheese. Stick to 350°F (175°C) and keep a close eye on the crust. If you’re using a convection oven, reduce the temperature by 25°F to avoid over‑browning. This small adjustment preserves the creamy center and ensures a consistent texture across all balls.
Why Your Nose Knows Best
The aroma of a nearly finished batch is a reliable indicator that the cheese is reaching its perfect melt point. When you smell the buttery, cheesy scent mingling with a hint of oregano, it’s time to pull the balls out. A strong, buttery aroma indicates the crust is golden, while a faint scent means you need a few more minutes. Trust your nose; it’s the ultimate guide to baking.
The 5-Minute Rest That Changes Everything
After removing the balls from the oven, let them rest for at least five minutes. This pause allows the cheese to set slightly, preventing a gooey mess when you bite in. The rest period also lets the flavors meld together, creating a more cohesive taste. Some people skip this step, but the difference is like night and day.
The Right Bread Choice
Serve the cheese balls with a variety of breads or crackers to complement the flavors. A sturdy baguette slice, a rustic rye cracker, or a crunchy pita chip all work wonderfully. The crunch of the bread balances the creamy interior, while the subtle flavors of the bread add depth. Experiment to find your favorite pairing.
The Final Touch
Just before serving, sprinkle a pinch of fresh herbs or a light drizzle of balsamic reduction over the balls. The herbs add a burst of color and freshness, while the balsamic adds a sweet, tangy finish that cuts through the richness. These final touches elevate the dish from good to unforgettable.
The Prep That Saves Time
If you’re short on time, prepare the dough in advance and refrigerate it for up to 24 hours. The dough will become firmer, making it easier to handle. When you’re ready to bake, simply roll out the dough, add the cheese mixture, and bake as usual. This prep trick saves you precious minutes on a busy night.
Creative Twists and Variations
This recipe is a playground. Here are some of my favorite ways to switch things up:
The Smoky Bacon Ball
Add crumbled smoked bacon to the cheese mixture for a smoky depth. The bacon’s saltiness balances the richness of the cheeses. Serve with a drizzle of maple syrup for a sweet‑savory contrast. This version is a hit at brunch or a casual gathering.
The Mediterranean Spinach Ball
Swap the cheddar for feta and add sun‑dried tomatoes, Kalamata olives, and oregano. The feta’s briny tang complements the spinach, while the olives add a salty punch. This Mediterranean twist is perfect for a Mediterranean-themed party.
The Vegan Delight
Replace all dairy with plant-based alternatives: use vegan cheddar, cashew cream, and nutritional yeast for the cheese base. Substitute breadcrumbs with crushed tortilla chips for a different crunch. This vegan version is surprisingly close to the original in flavor.
The Sweet & Spicy Ball
Incorporate a handful of chopped roasted red peppers and a dash of cayenne pepper into the mixture. The peppers add sweetness, while the cayenne brings a fiery kick. Top with a sprinkle of crushed pistachios for a nutty finish. This ball is a conversation starter.
The Herb Garden Ball
Add an extra handful of fresh herbs—basil, mint, dill, and thyme—to the cheese mixture. The herbs infuse the ball with bright, aromatic layers that complement the cheeses. Finish with a drizzle of lemon vinaigrette for a zesty lift. This version is ideal for a garden party.
The Classic Trio
Keep the original cheeses but separate them into three distinct balls. One ball focuses on cheddar, one on blue, and one on spinach & artichoke. This way, guests can choose their favorite or try all three. The presentation is elegant and offers variety.
Storing and Bringing It Back to Life
Fridge Storage
Store the baked balls in an airtight container in the refrigerator for up to 48 hours. The airtight environment prevents the crust from becoming soggy. When ready to serve, let them sit at room temperature for ten minutes before plating. The cheese will regain its creamy texture.
Freezer Friendly
For longer storage, wrap each ball tightly in parchment paper and then in foil before freezing. They’ll keep well for up to three months. Thaw overnight in the refrigerator, then reheat in a preheated oven at 350°F (175°C) for ten minutes. The crust will regain its crispness.
Best Reheating Method
To reheat, place the balls on a baking sheet and bake at 350°F (175°C) for 10–12 minutes. Add a splash of water to the bottom of the pan to create steam, which keeps the interior moist. Avoid microwaving, as it can make the crust rubbery and the cheese unevenly melted.