Why you'll love this recipe
- Restaurant-quality at home
- Make-ahead indulgence
- Crowd‑pleaser for celebrations
- Elegant party centerpiece
- Impressive layered texture
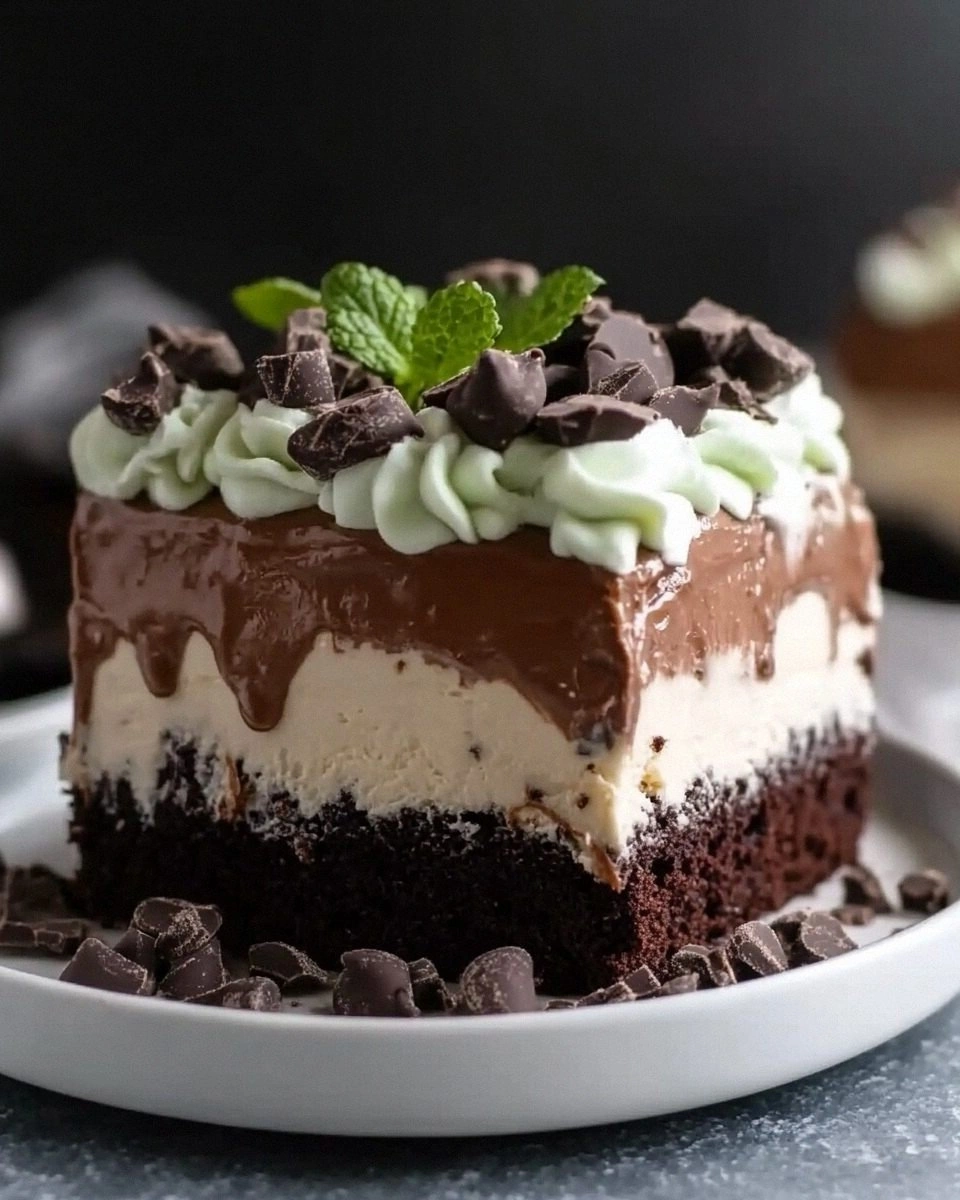
I still remember the first time I sliced into a Tuxedo Cake at my aunt’s birthday party— the room filled with the scent of melted chocolate, and the glossy ganache caught the chandelier light like a mirror. My niece reached for a piece, her eyes widening as the mousse folded into her fork, and I knew I had to bring that magic home. When I finally nailed the layers in my tiny apartment kitchen, the moment the ganache poured over the chilled mousse felt like a tiny victory dance. The cake has since become the centerpiece of every holiday table, and each bite still takes me back to that first, unforgettable sparkle.
The story
The moment the oven opens, a warm wave of cocoa and butter washes over the kitchen, and the glossy ganache glistens like midnight on a moonlit lake. A single forkful releases a cascade of dark and white chocolate mousse that sighs as it meets the tongue. You’ll hear the faint crackle of the top layer as you slice through the silky layers.
I first fell for this tuxedo‑styled marvel at my sister’s wedding, where the bride’s mother served a miniature version that melted in our mouths. The next weekend I begged the baker for the recipe, and after a few trial runs, the exact balance of mousse and cake finally clicked in my own pantry. Now it’s the dessert I pull out whenever I need a show‑stopper that also feels personal.
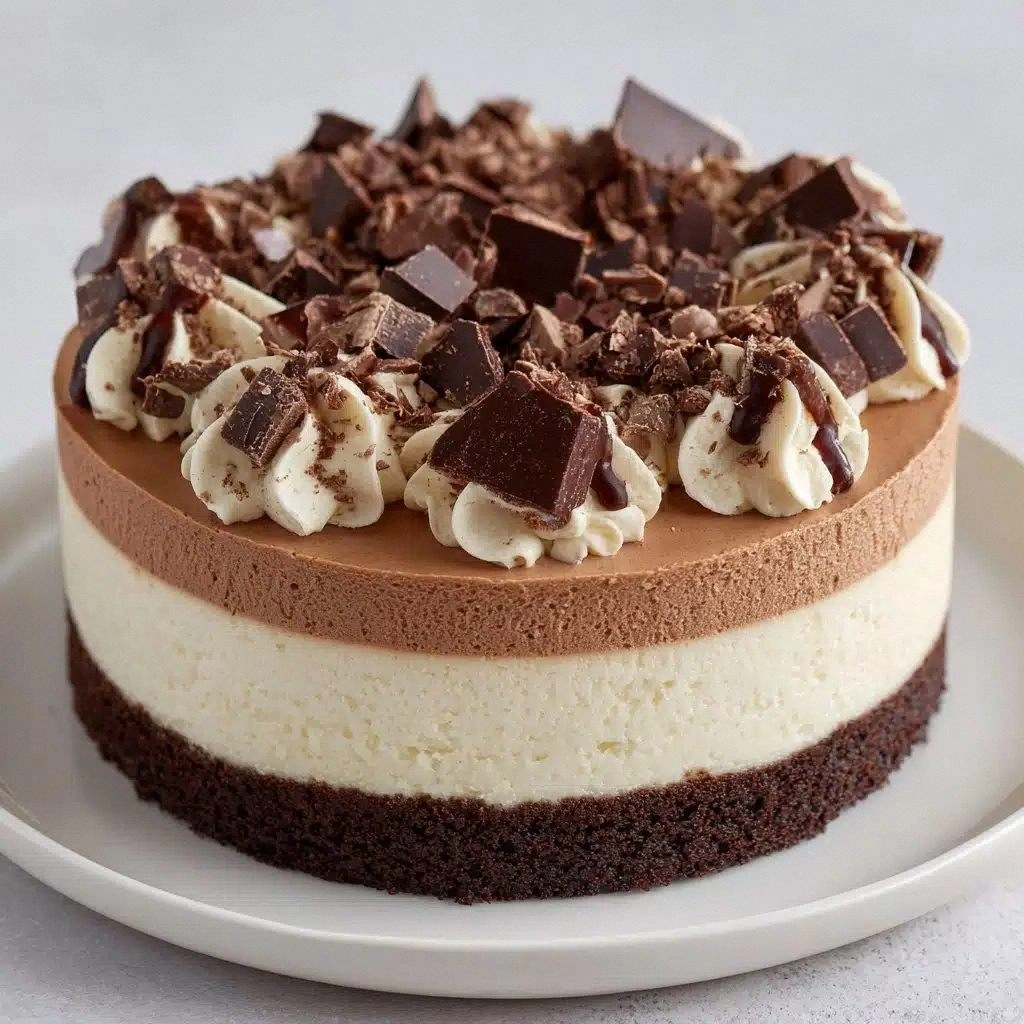
What sets this version apart is the double‑mousse technique: a dark chocolate mousse sandwiched between two layers of cake, then a light white chocolate mousse, all crowned with a glossy ganache that’s gently warmed, not tempered. The batter is split before baking, giving each layer a distinct crumb that holds up to the weight of the mousse without sinking. A brief chill between each assembly step ensures every component stays perfectly set.
First, the cake itself offers a tender, cocoa‑kissed crumb that’s subtly sweet, then the dark chocolate mousse adds a deep, slightly bitter richness that balances the sugar. The white chocolate mousse follows with buttery, creamy sweetness, creating a playful contrast of textures—silky versus airy, dense versus light. Finally, the ganache brings a glossy, buttery finish that ties the flavors together while adding a hint of salty butter.
Picture this as the centerpiece of a holiday dinner, a crowd‑pleasing finale at a potluck, or a make‑ahead treat for a date night when you want to impress without the stress. Serve each slice with fresh berries and a dollop of whipped cream, or pair it with a glass of port for an elegant touch. Because it can be assembled a day ahead, you’ll spend less time in the kitchen and more time enjoying the compliments.
Don’t let the multiple layers intimidate you; the key is simple prep and patience. The batter is easy to split, the mousse only needs chilled cream and melted chocolate, and the ganache comes together in minutes over low heat. With a little chill time, even a novice can pull off a dessert that looks and tastes like it belongs in a five‑star pâtisserie.
Why This Recipe Works
- Dividing batter before baking creates lighter, more uniform cake layers.
- Chilling each mousse solidifies structure, preventing collapse during assembly.
- A thin ganache layer adds shine without sogging the cake base.
Ingredient notes & substitutions
dark chocolate
Provides a deep, bittersweet backbone that anchors the mousse.
white chocolate
Adds creamy sweetness and a light contrast to the dark mousse.
heavy cream
Creates the silky body of both mousse layers and the ganache.
buttermilk
Reacting with baking soda gives the cake a tender, fluffy crumb.
unsweetened cocoa powder
Intensifies chocolate flavor without adding extra fat.
Equipment you'll need
Ingredients
- 1 cup all-purpose flour
- 1 cup granulated sugar
- ⅓ cup unsweetened cocoa powder
- 1 teaspoon baking soda
- ½ teaspoon baking powder
- ½ teaspoon salt
- 1 large egg
- ½ cup buttermilk
- ½ cup warm water
- ¼ cup vegetable oil
- 1 teaspoon vanilla extract
- 8 ounces dark chocolate (chopped)
- 1 ½ cups heavy cream
- 2 tablespoons granulated sugar
- 8 ounces white chocolate (chopped)
- 1 ½ cups heavy cream
- 2 tablespoons granulated sugar
- ½ cup heavy cream
- 4 ounces semi-sweet chocolate (chopped)
Before You Start
- Preheat oven to 350°F
- Grease and line cake pans
- Measure flour on a scale
- Chill bowls for chocolate
- Separate egg and bring to room temperature
Instructions
- 1Step 1
Preheat oven to 350°F (175°C) and prepare cake pans. Mix dry ingredients, add wet ingredients, divide batter, and bake until done. Cool.
- 2Step 2
Melt dark chocolate, whip cream with sugar, fold into chocolate, chill.
- 3Step 3
Repeat process with white chocolate and cream.
- 4Step 4
Layer dark chocolate mousse between cake layers, then white chocolate mousse. Chill.
- 5Step 5
Heat cream, pour over chocolate, stir, cool slightly, pour over cake. Refrigerate until set.
Pro tips
Preheat pans properly
Grease and line each pan with parchment before the oven reaches full temperature to prevent sticking.
Divide batter evenly
Use a kitchen scale to split the batter for uniform cake layers.
Cool cakes completely
Allow cakes to cool on a wire rack before assembling; warm cake melts the mousse.
Whip cream to soft peaks
Stop whisking at soft peaks; over‑whipping turns cream into butter.
Temper chocolate gently
Melt chocolate over a simmering pot, stirring constantly to keep temperature low.
Chill mousse before layering
Refrigerate each mousse at least 30 minutes so it sets before adding the next layer.
Spread ganache thinly
A thin ganache layer prevents soggy cake and keeps slices clean.
Use a bench scraper
Level each cake layer for a tidy stack and even layers.
Variations to try
Dairy‑Free Version
Swap heavy cream for coconut cream, use dairy‑free white chocolate, and replace buttermilk with soy‑milk + lemon.
Espresso Infused Twist
Dissolve instant espresso powder into the dark chocolate ganache for a mocha depth.
Berry Swirl Mini Cups
Pipe mousse into cupcake liners, fold in fresh raspberries, and chill for bite‑size party treats.
Holiday Peppermint Finish
Sprinkle crushed peppermint candies over the ganache for a festive sparkle.
Serving Suggestions
Troubleshooting
Mousse is grainy
Ensure cream is fully chilled and whip to soft peaks; avoid overheating the chocolate.
Ganache is too thick
Warm gently and stir in a splash of cream until it reaches a pourable consistency.
Cake layers stick together
Cool cakes completely and place parchment between layers before adding mousse.
Cake crumb is dense
Do not overmix the batter; fold dry ingredients gently and bake just until a toothpick comes out clean.
Storage & make-ahead
Refrigerator
Store in an airtight container; keep chilled up to 3 days.
Freezer
Wrap tightly and freeze slices for up to 2 months; thaw overnight in the fridge.
Best way to reheat
Serve cold, but if warmed, microwave 10‑15 seconds per slice and add fresh ganache.
Make-ahead
Assemble mousse layers and chill 24 hrs; add ganache just before serving.
Ingredients
- 1 cup all-purpose flour
- 1 cup granulated sugar
- ⅓ cup unsweetened cocoa powder
- 1 teaspoon baking soda
- ½ teaspoon baking powder
- ½ teaspoon salt
- 1 large egg
- ½ cup buttermilk
- ½ cup warm water
- ¼ cup vegetable oil
- 1 teaspoon vanilla extract
- 8 ounces dark chocolate (chopped)
- 1 ½ cups heavy cream
- 2 tablespoons granulated sugar
- 8 ounces white chocolate (chopped)
- 1 ½ cups heavy cream
- 2 tablespoons granulated sugar
- ½ cup heavy cream
- 4 ounces semi-sweet chocolate (chopped)
Instructions
- 1Preheat oven to 350°F (175°C) and prepare cake pans. Mix dry ingredients, add wet ingredients, divide batter, and bake until done. Cool.
- 2Melt dark chocolate, whip cream with sugar, fold into chocolate, chill.
- 3Repeat process with white chocolate and cream.
- 4Layer dark chocolate mousse between cake layers, then white chocolate mousse. Chill.
- 5Heat cream, pour over chocolate, stir, cool slightly, pour over cake. Refrigerate until set.